Chat and Messaging Documentation
Introduction
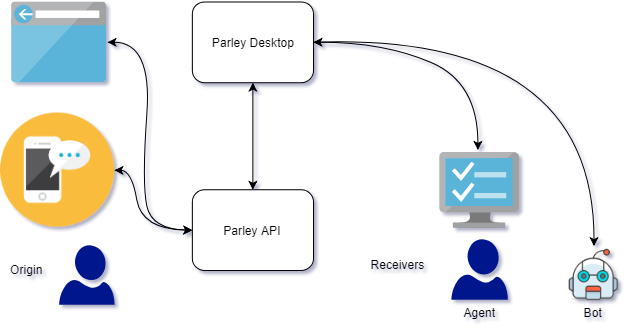
Parley's Chat and Messaging API enables you to offer your customers a messaging channel integrated into your website or app. This chat solution enables secure communication between your agent/bot desktop and client website/mobile app.
Devices displaying a webpage or app start communication to the company endpoint, where agents on desktop clients or a bot can respond to the customer's message. Messages can contain text or images.
API specification
Base URL
https://api-prd.kpn.com/communication/parley/secure-messenger
Conceptual model
Definitions
Messaging channel
A bidirectional communication channel between the user and an agent of a service where one can exchange messages.
Agent
A person that is working in a service center or contact center to answer your questions.
DeviceID
A unique identifier for every device. Provide this value in the UniqueAppDeviceID header key of each request. The minimum length for the DeviceID is 10 characters.
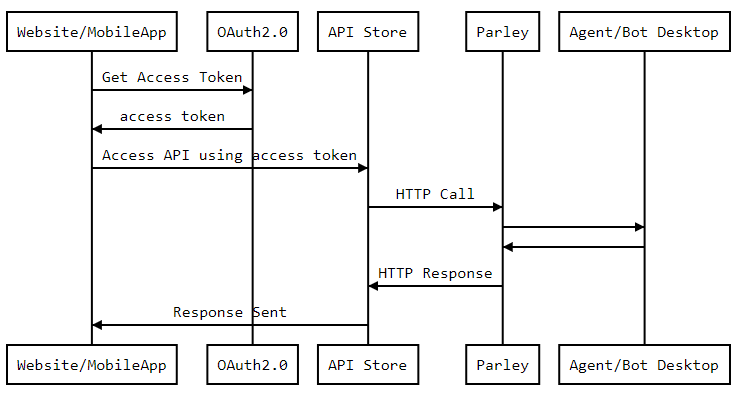
API workflow
Features and constraints
Features
- Secure chat and messaging channel between agent and client.
- Websites or mobile apps are supported as clients.
- Messages can include text or image.
- startTyping and stopTyping events can be used to indicate user activity.
- Paging of message history is supported.
Constraints
- An image attached to a message cannot exceed the size of 10 MB.
- A POST 'Messages' request can include text or an image, but not both in the same request.
Getting started
Make sure you've read What's in it for you for more info on how to register and start testing APIs.
Authentication
The API follows the KPN Store API Authentication Standard to secure the API. It includes the use of OAuth 2.0 client_id and client_secret to receive an access token.
Go to the Authentication tab on top of this page to find out how to:
- Authenticate to an API using cURL.
- Authenticate to an API on Swaggerhub.
- Import Open API Specifications (OAS), also called Swagger files into Postman.
How to...
Subscribe a device
- You need to subscribe the device before you can send and get messages. When you do not subscribe, we can't tell who you are, so this is important.
- When you subscribe you will also want to setup the
pushTokenandpushTypeof your device to receive updates when a new event or message is available for this device. - For each request, you need to provide the
UniqueAppDeviceIDkey. This is a unique identifier that you have to create here for each device. The identifier has a minimum length of 10 characters.
SwaggerHub:
- Select
POST /devices. - Click
Try it out. - Edit the parameters by filling out the
unqiueAppDeviceId. For receiving messages also fill out thepushToken,pushTypeandtypeparameters. Please refer to the Swagger file for more detail. - Click
Execute. - Check the response code and message.
Postman:
- Select
(GET) Config. - Fill out
uniqueAppDeviceIdin the Headers section. - Click
Send. - Check the response code and message.
Response example
{
"data": {},
"notifications": [
{
"type": "success",
"message": "device_successfully_subscribed"
}
],
"status": "SUCCESS",
"metadata": {
"values": {
"url": "devices"
},
"method": "post",
"duration": 0.004
}
}
Get the configuration
Request the configuration for the identified account. This contains settings and display settings of the account. All colors are RGB colors saved in hexadecimals.
SwaggerHub:
- Select
GET /config. - Click
Try it out. - Edit the parameters by filling out the
unqiueAppDeviceId. - Click
Execute. - Check the response code and message.
Postman:
- Select
(GET) Config. - Fill out
uniqueAppDeviceIdin the Headers section. - Click
Send. - Check the response code and message.
Response example
{
"data": {
"name": "KPN Hackathon Demo - 30",
"telephone": "",
"font": 4,
"allowImage": true,
"backgroundColor": "eeeeee",
"backgroundImage": "",
"iOSStatusBarTextColor": "0",
"navBackgroundColor": "415581",
"navTextColor": "ffffff",
"navHideCloseButton": false,
"dateBorder": false,
"dateColor": "4A5E83",
"iOSInputContainerBackgroundColor": "eeebe6",
"inputFieldBackgroundColor": "ffffff",
"inputFieldTextColor": "000000",
"inputFieldPlaceholderColor": "666666",
"inputBackgroundColor": "415581",
"inputTextColor": "ffffff",
"balloonStyle": 2,
"userBackgroundColor": "ffffff",
"userTextColor": "4A5E83",
"userTextLinkColor": "52d160",
"userTimeColor": "52d160",
"userSentColor": "52d160",
"accountBackgroundColor": "415581",
"accountTextColor": "ffffff",
"accountTextLinkColor": "52d160",
"accountTimeColor": "52d160",
"infoTextBackgroundColor": "eeeeee",
"infoTextBorder": 1,
"infoTextColor": "415581",
"infoText": "Heb je een vraag? Laat het ons weten via deze chat. Zodra we een antwoord hebben krijg je een notificatie.",
"infoText2": "Heb je een vraag? Laat het ons weten via deze chat. We kunnen je helaas geen notificaties sturen wanneer we je vraag hebben beantwoord, kijk regelmatig even of we je al hebben kunnen helpen.",
"genericPushMessage": "",
"authorizationRequired": "0"
},
"notifications": [],
"status": "SUCCESS",
"metadata": {
"values": {
"url": "config"
},
"method": "get",
"duration": 0.003
}
}
Indicate user starts typing
Fire the startTyping event to indicate that the user is typing something. To be used and triggered in your app or website.
SwaggerHub:
- Select
POST /services/event/startTyping. - Click
Try it out. - Edit the parameters by filling out the
unqiueAppDeviceId. - Click
Execute. - Check the response code and message.
Postman:
- Select
(POST) StartTyping. - Fill out
uniqueAppDeviceIdin the Headers section. - Click
Send. - Check the response code and message.
Response example
{
"data": "event startTyping executed",
"notifications": [],
"status": "SUCCESS",
"metadata": {
"values": {
"url": "services/event/startTyping"
},
"method": "post",
"duration": 0.069
}
}
Indicate user stops typing
Fires the stopTyping event to indicate the user is not typing anymore. To be used and triggered in your app or website.
SwaggerHub:
- Select
POST /services/event/stopTyping. - Click
Try it out. - Edit the parameters by filling out the
unqiueAppDeviceId. - Click
Execute. - Check the response code and message.
Postman:
- Select
(POST) stopTyping. - Fill out
uniqueAppDeviceIdin the Headers section. - Click
Send. - Check the response code and message.
Response example
{
"data": "event stopTyping executed",
"notifications": [],
"status": "SUCCESS",
"metadata": {
"values": {
"url": "services/event/stopTyping"
},
"method": "post",
"duration": 0.011
}
}
Send a message
Post a message to the API where the 'sender' is a particular user.
You can choose to send a text message or a message with an image. For the textual message, you send a 'regular' POST request with the parameters described in
Query parameters. To send an image in a message, you need to send a POST as multipart/form-data with the attributes fromRequest Body schema.
SwaggerHub:
- Select
POST /messages. - Click
Try it out. - Edit the parameters by filling out the
unqiueAppDeviceIdandmessage. - Click
Execute. - Check the response code and message.
Postman:
- Select
(POST) New Message. - Fill out
uniqueAppDeviceIdin the Headers section. - Fill out
messagein the Body section. (or use '''image''' to upload a file). - Click
Send. - Check the response code and message.
Response example
{
"data": {
"messageId": "1"
},
"notifications": [],
"status": "SUCCESS",
"metadata": {
"values": {
"url": "messages",
"message": "Hello, I have a question."
},
"method": "post",
"duration": 0.012
}
}
Get a list of messages
Get the latest 50 messages from and to a particular user. The order is by time and descending (from new to old).
SwaggerHub:
- Select
GET /messages. - Click
Try it out. - Edit the parameters by filling out the
unqiueAppDeviceId. - Click
Execute. - Check the response code and message.
Postman:
- Select
(GET) Latest Messages. - Fill out
uniqueAppDeviceIdin the Headers section. - Click
Send. - Check the response code and message.
Response example
{
"data": [
{
"id": 1,
"time": 1548335198,
"message": "Hello, I have a question.",
"image": null,
"typeId": 1,
"agent": null
}
],
"notifications": [],
"status": "SUCCESS",
"metadata": {
"values": {
"url": "messages"
},
"method": "get",
"duration": 0.005
},
"agent": {
"id": null,
"name": null,
"avatar": null,
"isTyping": null
},
"paging": {
"before": "",
"after": "/messages/after:1"
},
"stickyMessage": null
}
Get a single specific message
Retrieve a specific message by the message ID.
SwaggerHub:
- Select
GET /messages/{id}. - Click
Try it out. - Edit the parameters by filling out the
unqiueAppDeviceIdandid. - Click
Execute. - Check the response code and message.
Postman:
- Select
(GET) Latest Messages. - Fill out
uniqueAppDeviceIdin the Headers section andidin the URL. - Click
Send. - Check the response code and message.
Response example
{
"data": {
"id": 2,
"time": 1548335743,
"message": "What is my current balance?",
"image": null,
"typeId": 1,
"agent": null
},
"notifications": [],
"status": "SUCCESS",
"metadata": {
"values": {
"url": "messages/2"
},
"method": "get",
"duration": 0.003
}
}
Get older/newer messages
Retrieve messages by a paginator, defined as "before:messageID" or "after:messagedID".
SwaggerHub:
- Select
GET /messages/{paging}:{id}. - Click
Try it out. - Edit the parameters by filling out the
unqiueAppDeviceId,pagingandid. - Click
Execute. - Check the response code and message.
Postman:
- Select
(GET) Latest Messages using paging. - Fill out
uniqueAppDeviceIdin the Headers section. Also, fill outpagingandidin the URL. - Click
Send. - Check the response code and message.
For example:
Request example
/messages/before:2
returns:
Response example
{
"data": [
{
"id": 1,
"time": 1548335198,
"message": "Hello, I have a question.",
"image": null,
"typeId": 1,
"agent": null
}
],
"notifications": [],
"status": "SUCCESS",
"metadata": {
"values": {
"url": "messages/before:2"
},
"method": "get",
"duration": 0.004
},
"agent": {
"id": null,
"name": null,
"avatar": null,
"isTyping": null
},
"paging": {
"before": "",
"after": "/messages/after:1"
},
"stickyMessage": null
}
Return codes
In case of a 502 return code, the error description is in the response. For example in case the UniqueAppDeviceID is missing or misspelled:
{
"error": {
"transactionId": "apn07-4664-712680-9",
"status": "502 - Bad Gateway",
"name": "Bad - Request",
"message": {
"notifications": [
{
"type": "error",
"message": "device_not_registered"
}
],
"status": "ERROR",
"metadata": {
"values": {
"url": "messages/before:2"
},
"method": "get",
"duration": 0.003
}
},
"info": "https://developer.cubesbykpn.com"
}
}