Dispatch Documentation
Introduction
Nexmo is now called Vonage, but there are still references to Nexmo in our URLs, code snippets and message templates.
The Dispatch API by Vonage enables sending customer messages using a multiple channel strategy with fallback condition. You can send SMS text messages, MMS messages, WhatsApp messages, Facebook messages and Viber Service messages. The API provides a mechanism to specify the success conditions for messages and redirect to set fallback channels accordingly.
API specification
Base URL
https://api-prd.kpn.com/communication/nexmo
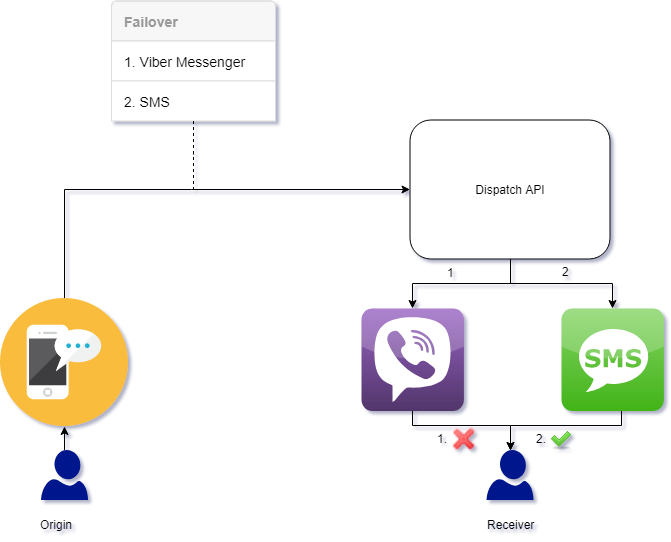
Conceptual model
The model shows an example with a failover list of two elements. In this case, the sending user wants to send a message to a receiving user and defines the order to try sending via Viber first and then via SMS as failover.
Definitions
Messaging channels
A channel is a user-facing messenger from which end-users can send messages.
Failover
A backup operational mode in which the functions of a system component are assumed by secondary system components when the primary component becomes unavailable.
Failover condition
The failover applied to the messaging channels. Defines the criteria where the current channel fails and needs to trigger the next one from the list. The criteria is based on 2 variables:
- Condition status: Action to happen to consider the current step successful. The success of this step depends if this action happened before the time expired.
- Expiry time: The time window the status had to be fulfilled.
Example:
Send message through Viber and if it’s not delivered in 10s, send the same message using SMS. Webhook is an event notification transmitted via HTTP. It’s triggered when something happens. The data may be formatted in whatever way the developer chooses, though JSON and XML are the most preferred. Dispatch API uses the following webhooks:
- Message-status: Sends a POST request with any update related to the status of the message.
- Inbound-message: Receives the message send back from the receiver. Applies only to the messaging channels that supports replies.
- Final-report: Sends a POST request at the end of the failover with the details of the actions taken.
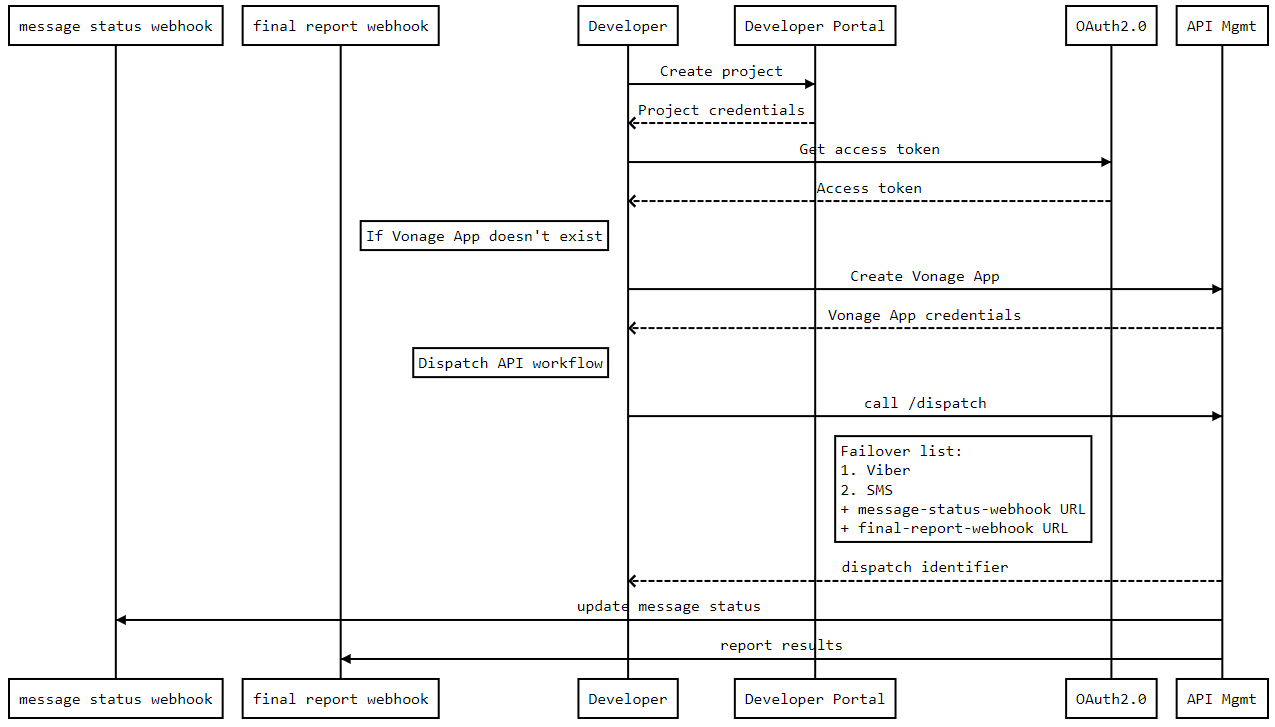
API workflow
Requirements
You need a Vonage application instance to send messages.
Viber
Viber Service Messages can only be sent by businesses that have been approved by Viber. This business profile will also have a green check to indicate that it is a legitimate business.
In order to get started with Viber Service Messages, you will need to email api_developer@kpn.com. Developer Portal is going to handle the creation of your Viber Business account with the help of an official partner and come back to you with a Viber Service Messages ID.
Facebook Messenger
Only an individual may have a Facebook Profile, whereas a business must have a Facebook Page. A Facebook user must initiate communication using Facebook Messenger via the business's Facebook Page. A message from the business to the Facebook user will otherwise be refused.
Facebook Messenger uses its own form of IDs for the Facebook User and the Facebook Page:
- Facebook User (profile) - Page-Scoped ID (PSID).
- Facebook Page (business) - Page ID.
The Facebook User will have a Page-scoped ID (PSID) and this is unique for each Facebook Profile. The business can only obtain the PSID of a user when the user sends a message to the business. In Facebook Messenger, the default is for the customer to initiate a conversation with a business.
In order to get started with Facebook Messenger you will need to link your business's Facebook Page to the Developer Portal. Contact api_developer@kpn.com with your application ID and your Facebook page ID.
You can then test things by sending a message as a Facebook User to your own Facebook Page. At this point, you will receive an inbound message webhook to your server with the PSID of the Facebook user. You can now use this PSID to send a message back to the user.
WhatsApp Business Solution can only be sent by businesses that have been approved by WhatsApp. This business profile will also have a green verified label to indicate that it is a legitimate business.
In order to get started with WhatsApp, you will need to email api_developer@kpn.com. Developer Portal is going to handle the creation of your WhatsApp Business account with the help of an official partner. Currently, WhatsApp is in Limited Availability and only a certain number of customers will be onboarded.
Features and constraints
Features
- Supported messaging channels:
- SMS.
- Viber Service Messenger.
- Facebook.
- Whatsapp.
Constraints
- Each Vonage application can have a max of 1 account of each of the following platforms:
- Viber.
- Facebook.
- Whatsapp.
- The WhatsApp Business Solution may not be used to send any messages to or receive messages from the following countries: Crimea, Cuba, Iran, North Korea and Syria.
Getting started
Make sure you've read What's in it for you for more info on how to register and start testing APIs.
Authentication
The API follows the KPN Store API Authentication Standard to secure the API. It includes the use of OAuth 2.0 client_id and client_secret to receive an access token.
Go to the Authentication tab on top of this page to find out how to:
- Authenticate to an API using cURL.
- Authenticate to an API on Swaggerhub.
- Import Open API Specifications (OAS), also called Swagger files into Postman.
Set up your third-party accounts
Set up Facebook Messaging
Send an e-mail to api_developer@kpn.com to apply for the JWT token. The Application ID and developer application name are required in order to generate the JWT token.
Log in to this website https://static.nexmo.com/messenger/ and follow the steps.
Set up WhatsApp Business Messenger
A business can start a conversation with a user and a user can start a conversation with a business.
WhatsApp has a core concept of Messages Templates (MTM). These were previously known as Highly Structured Messages (HSM).
WhatsApp requires that a message sent to a user for the first time, or is outside the Customer Care Window, is an MTM message.
The MTM allows a business to send just the template identifier along with the appropriate parameters instead of the full message content.
New templates need to be approved by WhatsApp. Please contact the Developer Portal to submit the templates. Over time Developer Portal will also add generic templates that can be used by all businesses.
MTMs are designed to reduce the likelihood of spam to users on WhatsApp.
For the purpose of testing, the Developer Portal provides a template created by Vonage, whatsapp:hsm:technology:nexmo:verify, that you can use:
Messages Template example
{{1}} code: {{2}}. Valid for {{3}} minutes.
Response example
{
"from":{
"type":"whatsapp",
"number":"WHATSAPP_NUMBER"
},
"to":{
"type":"whatsapp",
"number":"TO_NUMBER"
},
"message":{
"content":{
"type":"template",
"template":{
"name":"whatsapp:hsm:technology:nexmo:verify",
"parameters":[
{
"default":"Nexmo Verification"
},
{
"default":"64873"
},
{
"default":"10"
}
]
}
}
}
}
If your customer initiates messaging with you, WhatsApp will not charge you for any messages (including MTMs) that you send back to the customer, for up to 24 hours following the last message that your customer sent you. This 24 hour period is known as the Customer Care Window. Any additional message you send to that customer beyond the Customer Care Window must be an MTM, for which WhatsApp will charge you.
How to...
Create an application
SwaggerHub:
- Select
POST /applications. - Click on
Try out. - Edit the request body by filling the
name,type,status_urlandinbound_url. - Click on
executebutton. - Check the response code and message.
Postman:
- Click on
(POST) Create new application resource. - Fill the
name,type,status_urlandinbound_url. - Click on
send. - Check the response code and message.
Remember the application id because it will be needed to use Dispatch
Check owned applications
SwaggerHub:
- Select
GET /applications. - Click on
Try out. - Edit the parameters by filling the
page_indexandpage_size. - Click on
executebutton. - Check the response code and message.
Postman:
- Click on
(GET) Retrieve your applications resource. - Fill the
name, thepage_indexandpage_size. - Click on
send. - Check the response code and message.
Check application details
SwaggerHub:
- Select
GET /applications/{uuid}. - Click on
Try out. - Edit the parameters by filling the
application uuid. - Click on
executebutton. - Check the response code and message.
Postman:
- Click on
(GET) Retrieve an application resource. - Fill the
application uuidin the URL. - Click on
send. - Check the response code and message.
Update application configuration
SwaggerHub:
- Select
PUT /applications/{uuid}. - Click on
Try out. - Edit the the parameters by filling the
application uuidand thechanges on name,type,answer_urlandevent_url. Optional fields to be updated include are answer_method and event_method. - Click on
executebutton. - Check the response code and message.
Postman:
- Click on
(PUT) update an application resource. - Fill the parameters by filling the
application uuidand thechanges on name,type,answer_urlandevent_url. Optional fields to be updated include are answer_method and event_method. - Click on
send. - Check the response code and message.
Delete an application
SwaggerHub:
- Select
DELETE /applications/{uuid}. - Click on
Try out. - Edit the parameters by filling the
application uuid. - Click on
executebutton. - Check the response code and message.
Postman:
- Click on
(DELETE) Destroy an application resource. - Fill the parameters by filling the
application uuid. - Click on
send. - Check the response code and message.
Send message with failover
SwaggerHub:
- Select
POST /dispatch. - Click on
Try out. - Edit the
applicationIDparameter and customize the body with your workflow. - Click on
executebutton. - Check the response code and message.
Postman:
- Click on
(POST) Send Message resource. - Fill the
ApplicationIdin the header and the body with the information to send messages. - Click on
send. - Check the response code and message.
Facebook Messenger example
Facebook messenger example
{
"from":
{
"type": "messenger",
"id": "FB_SENDER_ID"
},
"to":
{
"type": "messenger",
"id": "FB_RECIPIENT_ID"
},
"message":
{
"content":
{
"type": "text",
"text": "This is a Facebook Messenger message sent from the Dispatch API"
}
}
}
Viber example
Viber message example
{
"from":
{
"type": "viber_service_msg",
"id": "VIBER_SERVICE_MESSAGE_ID"
},
"to":
{
"type": "viber_service_msg",
"id": "TO_NUMBER"
},
"message":
{
"content":
{
"type": "text",
"text": "This is a Viber Service Message sent from the Dispatch API"
}
}
}
WhatsApp example
Steps:
- Send MTM template.
- Send Message to WhatsApp.
WhatsApp MTM Template example
{
"template":"failover",
"workflow":[
{
"from":{
"type":"whatsapp",
"number":"$WHATSAPP_NUMBER"
},
"to":{
"type":"whatsapp",
"number":"$TO_NUMBER"
},
"message":{
"content":{
"type":"template",
"template":{
"name":"whatsapp:hsm:technology:nexmo:verify",
"parameters":[
{
"default":"Nexmo Verification"
},
{
"default":"64873"
},
{
"default":"10"
}
]
}
}
},
"failover":{
"expiry_time":600,
"condition_status":"read"
}
},
{
"from":{
"type":"sms",
"number":"$FROM_NUMBER"
},
"to":{
"type":"sms",
"number":"$TO_NUMBER"
},
"message":{
"content":{
"type":"text",
"text":"This is an SMS sent via the Dispatch API"
}
}
}
]
}
WhatsApp message example
{
"template":"failover",
"workflow":[
{
"from":{
"type":"whatsapp",
"number":"447418342140"
},
"to":{
"type":"whatsapp",
"number":"918197792563"
},
"message":{
"content":{
"type":"text",
"text":"This is logging message for test "
}
},
"failover":{
"expiry_time":60,
"condition_status":"read"
}
},
{
"from":{
"type":"sms",
"number":"31647356950"
},
"to":{
"type":"sms",
"number":"31617185666"
},
"message":{
"content":{
"type":"text",
"text":"This is a fallback SMS sent from the Workflows API for whatsapp messenger"
}
}
}
]
}