Messages Documentation
Introduction
Nexmo is now called Vonage, but there are still references to Nexmo in our URLs, code snippets and message templates.
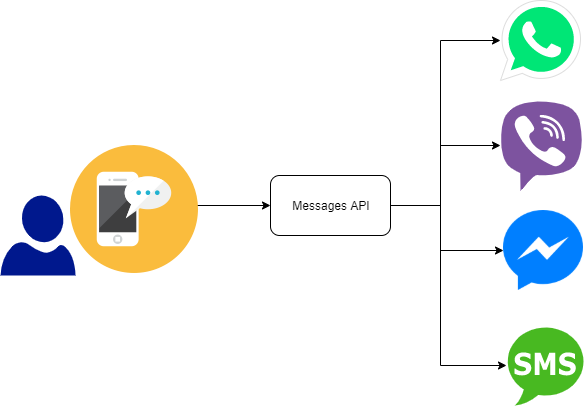
Vonage's (formerly called Nexmo) Messages API consists of multiple messaging APIs that act as a gateway to the following channels:
- WhatsApp Business.
- Viber Service Messages.
- Facebook Messenger.
- SMS text messaging.
The Vonage Messages API does this by normalising the information across all channels to abstracted parameters to, from and message.
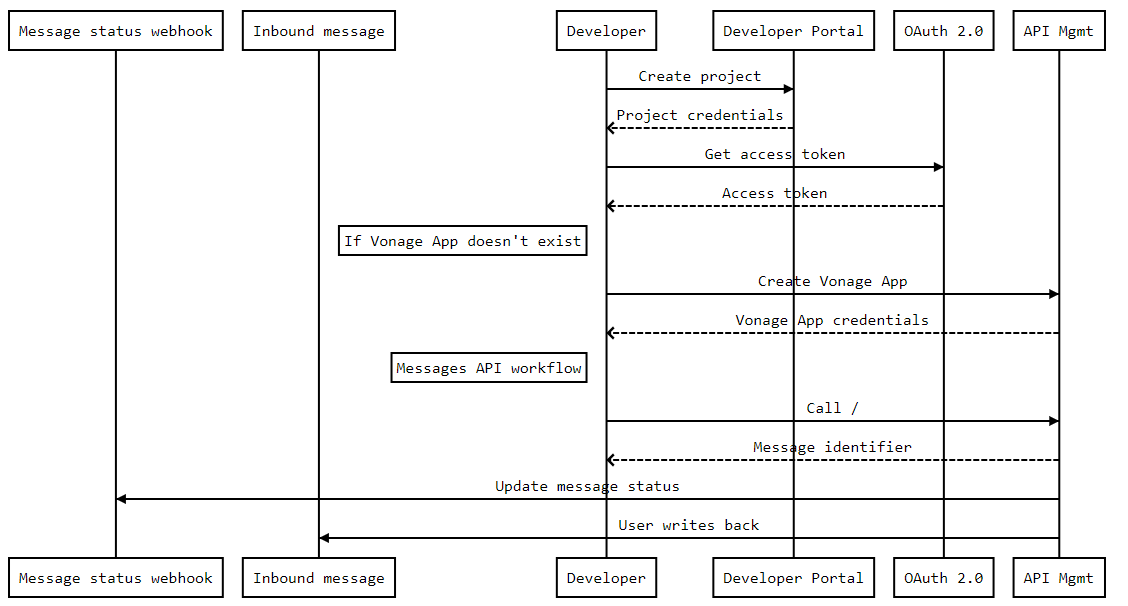
The Messages API uses a concept called Applications, the endpoints for managing these can be found in the Swagger and Postman collections.
API specification
Base URL
https://api-prd.kpn.com/communication/nexmo
Conceptual model

Definitions
inbound_url
The URL to which inbound messages are sent.
status_url
The URL to which the status of each message is sent. The status value can be submitted, delivered, read, rejected or undeliverable.
UUID
A universally unique identifier (UUID) is a 128-bit number used to identify information in computer systems.
Webhook
Webhooks are an extension of an API, but instead of your code requesting data from Vonage, Vonage sends data to you. The data arrives in a web request to your application. A webhook may be the result of an earlier API call (this type of webhook is also called a "callback"). Webhooks are also used to notify your application of events such as an incoming call or message.
Application
An extra layer for added security and additional configuration options for webhooks and phonenumbers.
API workflow

Features and constraints
Features
| Channel | Outbound Text | Outbound Image | Outbound Audio | Outbound Video | Outbound File | Outbound Template |
|---|---|---|---|---|---|---|
| YES | YES | YES | YES | YES | YES | |
| Viber Service Messages | YES | YES | N/A | N/A | N/A | YES |
| Facebook Messenger | YES | YES | YES | YES | YES | YES |
| SMS | YES | N/A | N/A | N/A | N/A | N/A |
| Channel | Inbound Text | Inbound Image | Inbound Audio | Inbound Video | Inbound File | Inbound Template |
|---|---|---|---|---|---|---|
| YES | YES | YES | YES | YES | YES | |
| Viber Service Messages | YES | N/A | N/A | N/A | N/A | YES |
| Facebook Messenger | YES | YES | YES | YES | YES | YES |
Constraints
- Each Messages application can have a maximum of 1 account of each of the following platforms:
- WhatsApp Business.
- Viber Service Messages.
- Facebook Messenger.
- WhatsApp Business messages can only be sent and received by businesses that have been approved by WhatsApp.
- WhatsApp Business cannot be used to send to or receive messages from the following countries:
- Crimea.
- Cuba.
- Iran.
- North Korea.
- Syria.
WhatsApp Message Templates
- WhatsApp has specific rules for message templates. A WhatsApp message sent to a user for the first time, or outside of the 'Customer Care Window' (the 24 hours after the last message your customer sent you), is required to be a WhatsApp Message Template Message (MTM).
- MTM allows a business to send the template identifier along with the appropriate parameters, instead of the full message content. MTMs are designed to reduce the likelihood of spam being sent to users on WhatsApp.
If your customer initiates messaging with you, WhatsApp will not charge you for any messages (including MTMs) that you send back to the customer within the Customer Care Window. Any additional message you send to that customer beyond the Customer Care Window must be an MTM, for which WhatsApp will charge you.
Example WhatsApp API call
{
"from": "WHATSAPP_FROM_NUMBER",
"to":"WHATSAPP_TO_NUMBER",
"channel": "whatsapp",
"message":{
"content":{
"type":"template",
"template":{
"name":"WHATSAPP_NAMESPACE:WHATSAPP_TEMPLATE_NAME",
"parameters":[
"Dirk",
"1234"
]
}
},
"whatsapp": {
"policy": "deterministic",
"locale": "nl"
}
}
}
Viber
- Viber Service Messages can only be sent by businesses that have been approved by Viber. The business profile should also have a green check to indicate that it is a legitimate business.
- A Facebook user can only initiate communication with your business using Facebook Messenger via your business's Facebook page. A message from your business to the Facebook user will otherwise be refused.
- Facebook Messenger uses its own IDs for users and business pages:
- Facebook User (profile): Page-Scoped ID (PSID).
- Facebook Page (business): Page ID.
- A user will have a Page-scoped ID (PSID), which is a unique ID for each Facebook user profile. A business can only obtain the PSID of a user when the user sends a message to the business via their page. In Facebook Messenger, the default is for the customer to initiate the conversation with a business.
Getting started
Make sure you've read What's in it for you for more info on how to register and start testing APIs.
Configuring Messages API for use requires multiple steps, outlined in bullet points below:
- Creating an application
- If needed, purchasing and configuring a phone number
- Linking the phone number to the application from step 1
- Linking your Meta (Facebook) business account via Embedded signup through our portal
- Creating a message template
- Generating a JWT from the private key received when creating an application
Authentication
The Messages API uses a combination of the KPN Developer Portal OAuth 2.0 flow and JWT authentication based on the keys from the application.
Refer to the authentication tab on top of this page to find out how to:
- Authenticate to an API using cURL
- Authenticate to an API on Swaggerhub
- Import Open API Specifications (OAS), also called Swagger files into Postman
The usage of the JWT token will be explained further down this page.
Setting up your third-party accounts
To get started with WhatsApp you can either setup your account via our embedded signup flow, the link can be found in our Developer Portal if you have Messages API in your project.
Or via Facebook business
Viber
To get started with Viber Service Messages you will need to e-mail us your API application key. We will handle the creation of your Viber Business Account with the help of an official partner and come back to you with a Viber Service Messages ID.
To get started with Facebook Messenger you will need to link your business's Facebook page to the API. In order to do this, login at Vonage's Facebook link page and follow their steps.
You can test whether Facebook Messenger is enabled by sending a message as a Facebook test user to your business' Facebook page. You will receive an inbound message webhook at your server with the ID of the test user. You can use this ID to send a message back to the user.
How to...
Configure an application and number
Make sure you're using V2 of the Application endpoint, by setting an
api-version: v2header.
Create an application
{BASE_URL}/applications/v2With this call an application is created and configured with the capability 'messages', this makes sure we can use the Messages API. We also configure the webhooks on application level, if we choose to send the webhooks with the API call to send a message, the application level webhooks will be ignored. The response will include a private key and public key which are needed to generate a JWT for authentication.
Create Application for use with Messages API
{
"name": "APPLICATION_NAME",
"capabilities": {
"messages": {
"webhooks": {
"inbound_url": {
"address": "WEBHOOK_URL",
"http_method": "METHOD"
},
"status": {
"address": "WEBHOOK_URL",
"http_method": "METHOD"
}
}
}
}
}
Search for an available number
{BASE_URL}/phone-numbers/number/searchThe next step, if no number is available yet, is to search for a number.
QueryParams:
- country: NL
- type: mobile-lvn
- features: SMS, VOICE
Purchase a number
{BASE_URL}/phone-numbers/number/buyOnce a number has been found, we can purchase the number, the msisdn field represents the number we would like to buy.
Purchase a number
{
"country": "NL",
"msisdn": "NUMBER_FROM_SEARCH"
}
Update a number to link with the application
{BASE_URL}/phone-numbers/number/updateWe now need to tie our number and application together. To do so we send a call with the app_id we received when creating the application in the body. The value voiceCallbackType and voiceCallbackValue are to be able to receive an OTP from Meta when configuring WhatsApp via embedded signup.
Update a number
{
"country": "NL",
"msisdn": "NUMBER_FROM_SEARCH",
"voiceCallbackType": "tel",
"voiceCallbackValue": "TELEPHONE_NUMBER",
"app_id": "APPLICATION_ID"
}
Link your WhatsApp Business account
The next step in configuration is to link your WhatsApp Business account with our portal. To do so, navigate to projects in your dashboard on our Developer Portal. If your project includes Messages API you'll find the link 'Setup my WhatsApp Business Account'.
Generate your JWT
To send a message with the Messages API you'll need to generate a JWT token based on your Application ID and private key received when creating an application.
The algorithm used should be RS256, for testing purposes a tool like the Vonage JWT generator can be used.
Send a WhatsApp message template
{BASE_URL}/messagesFinally it's time to test your message by sending a post request, with the following body.
Make sure to send the Authorization: Bearer {JWT} header when using this endpoint.
Send WhatsApp template
{
"message_type": "template",
"template": {
"name": "NAMESPACE:TEMPLATE_NAME",
"parameters": [
"Dirk",
"EU1234"
]
},
"to": "RECEIVING_NUMBER",
"from": "SENDING_NUMBER",
"channel": "whatsapp",
"whatsapp": {
"policy": "deterministic",
"locale": "TEMPLATE_LANGUAGE"
}
}
Direct WhatsApp message example:
WhatsApp message example
{
"message_type": "text",
"text": "Direct WhatsApp test message",
"to": "316xxxxxxxx",
"from": "31xxxxxxxxxx",
"channel": "whatsapp"
}
Apart form the WhatsApp message content type text, you can also use other types, such as template, custom, file, image, audio and video. The last 4 types, have the property url and point to a public URL where the files, image, audio or video is hosted. The maximum outbound media size is 64 Mb.
Various Message Examples
Document messages display a document icon, linked to a document that a WhatsApp user can tap to download.

Document message example
{
"messaging_product": "whatsapp",
"recipient_type": "individual",
"to": "<WHATSAPP_USER_PHONE_NUMBER>",
"type": "document",
"document": {
"id" : "<MEDIA_ID>", /* Only if using uploaded media */
"link": "<MEDIA_URL>", /* Only if linking to your media */
"caption": "<DOCUMENT_CAPTION>",
"filename": "<DOCUMENT_FILENAME>"
}
}
Interactive Call-to-Action URL Button Your customers may be hesistant to tap raw URLs containing lengthy or obscure strings in text messages. In these situations, you may wish to send an interactive call-to-action (CTA) URL button message.

Interactive CTA button request example
{
"messaging_product": "whatsapp",
"recipient_type": "individual",
"to": "<CUSTOMER_PHONE_NUMBER>",
"type": "interactive",
"interactive": {
"type": "cta_url",
/* Header optional */
"header": {
"type": "text",
"text": "<HEADER_TEXT>"
},
/* Body optional */
"body": {
"text": "<BODY_TEXT>"
},
/* Footer optional */
"footer": {
"text": "<FOOTER_TEXT>"
},
"action": {
"name": "cta_url",
"parameters": {
"display_text": "<BUTTON_TEXT>",
"url": "<BUTTON_URL>"
}
}
}
}
Interactive List Messages allow you to present WhatsApp users with a list of options to choose from (options are defined as rows in the request payload):

When a user taps the button in the message, it displays a modal that lists the options available:

Interactive list message request example
{
"messaging_product": "whatsapp",
"recipient_type": "individual",
"to": "<WHATSAPP_USER_PHONE_NUMBER>",
"type": "interactive",
"interactive": {
"type": "list",
"header": {
"type": "text",
"text": "<MESSAGE_HEADER_TEXT"
},
"body": {
"text": "<MESSAGE_BODY_TEXT>"
},
"footer": {
"text": "<MESSAGE_FOOTER_TEXT>"
},
"action": {
"sections": [
{
"title": "<SECTION_TITLE_TEXT>",
"rows": [
{
"id": "<ROW_ID>",
"title": "<ROW_TITLE_TEXT>",
"description": "<ROW_DESCRIPTION_TEXT>"
}
/* Additional rows would go here*/
]
}
/* Additional sections would go here */
],
"button": "<BUTTON_TEXT>",
}
}
}