Vonage SMS Documentation
Introduction
Nexmo is now called Vonage, but there are still references to Nexmo in our URLs, code snippets and message templates.
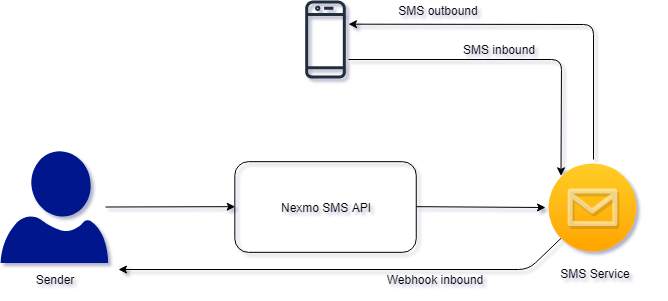
With Vonage's (formerly called Nexmo) SMS API, you can send and receive text messages. The API is a secure gateway to Nexmo's bulk SMS service for customer messaging.
API specification
Base URL
https://api-prd.kpn.com/communication/nexmo/sms
Conceptual model
Definitions
Webhook
A webhook is an HTTP POST callback implemented by you, that can be called by another system when an event is triggered on that system to notify you. You will need to make the address of your webhook known on the other system to make it work.
SMS
SMS stands for Short Message Service and is the most widely used type of text messaging. With an SMS, you can send a message of up to 160 characters to another device.
API workflow
Requirements
For receiving an SMS, this API depends on Vonage's Phone Numbers API, which you can use to create a virtual number. You need to apply for production in our portal for that API too.
Features and constraints
Features
- Send SMS: You can send SMS using mobile number, content and sender parameters in the request body of the SMS API.
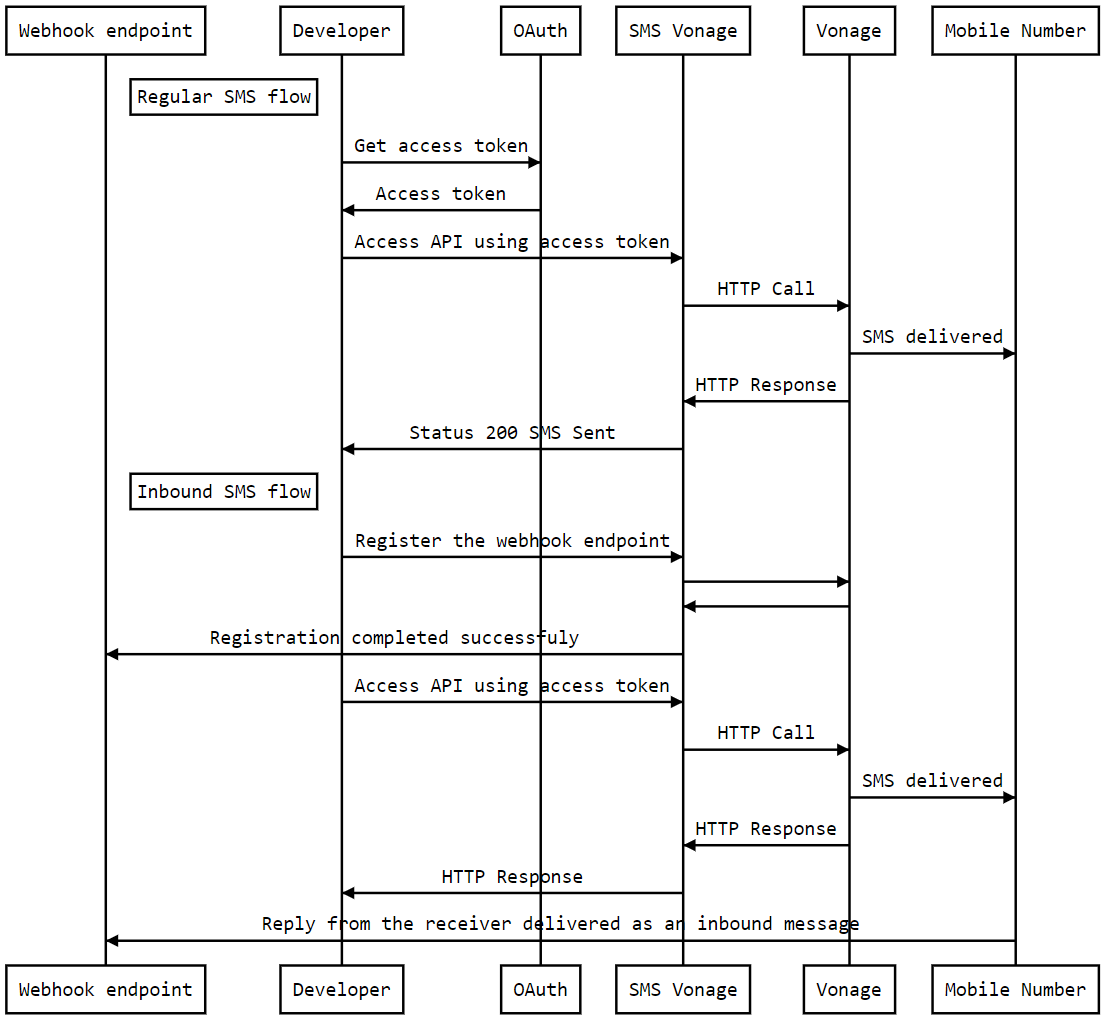
- Receive SMS: SMS using this API is easy. In order to do so, you'll need to create a webhook endpoint. Then you should register it using the SMS API. After you have registered your webhook endpoint/callback URL you can send an SMS using the mobile number, content, and sender parameters in the request body and selecting the yes option in the ‘inbound’ header of the SMS API. Inbound messages sent by SMS recipient will be delivered to this registered webhook.
Constraints
- To check which countries are supported, please view the Vonage help page.
Getting started
Make sure you've read What's in it for you for more info on how to register and start testing APIs.
Authentication
The API follows the KPN Store API Authentication Standard to secure the API. It includes the use of OAuth 2.0 client_id and client_secret to receive an access token.
Go to the Authentication tab on top of this page to find out how to:
- Authenticate to an API using cURL.
- Authenticate to an API on Swaggerhub.
- Import Open API Specifications (OAS), also called Swagger files into Postman.
How to...
Send SMS
{BASE_URL}/sendSwaggerHub:
- Select
POST /send. - Click 'Try it out'.
- Edit the parameters by filling out
from,to,textand other fields at will. - Click 'Execute'.
- Check the response code and message.
Postman:
- Select
(POST) Send SMS. - Click the
Bodysection of the request and provide values for the following keys:from,toandtext. Other advanced keys can be filled at will. - Click 'Send'.
- Check the response code and message.
Result example
{
"message-count": "1",
"messages": [
{
"to": "316*****",
"message-id": "13000000*****",
"status": "0",
"remaining-balance": "*****",
"message-price": "*****",
"network": "20408"
}
]
}
Receive an SMS
Handling inbound SMS with the API is easy. You just need to create a webhook endpoint and configure your number or account to point to the endpoint. If you are a test user then you can try inbound messaging using below using Register webhook endpoint. Otherwise, you should use the Phone Numbers API to search, buy and manage your virtual number. In order to use the Phone Numbers API you should take this App containing Phone Numbers API to production.
Register webhook endpoint
With a test application, you can try inbound messaging by registering your webhook against your own phone number you use for testing, without buying a virtual number. This is not applicable if you apply for production usage.
SwaggerHub:
- Select
POST /register. - Click 'Try it out'.
- Edit the parameters by filling out
toandcallback_url. - Click 'Execute'.
- Check the response code and message.
Postman:
- Select
(POST) Register callback URL to webhook for incoming messages. - Click the
Bodysection of the request and provide values for the following keys:toandcallback_url. - Click 'Send'.
- Check the response code and message.
Result example
{
"message": "Your callback url is registered."
}
Update a number
If you applied for production then you should manage your numbers using the Phone Numbers API. Under 'Update a number' you can register your webhook against your virtual number using the moHttpUrl parameter.
cURL request example
curl -X POST \
'https://api-prd.kpn.com/communication/nexmo/phone-numbers/number/update' \
-H 'authorization: Bearer access_token' \
-H 'Content-Type: application/x-www-form-urlencoded' \
-d 'country=NL&msisdn=447700900000&moHttpUrl=https://example.com:webhooks/inbound-sms'
SwaggerHub:
- Select
POST /number/update. - Click 'Try it out'.
- Edit the parameters by filling out
countryandmsisdn. Also edit the other parameters, as mentioned in the above table, to your needs. - Click 'Execute'.
- Check the response code and message.
Postman:
- Select
(POST) Update a number. - Click the
Bodysection of the request and provide values forcountryandmsisdn. Also edit the other parameters in the body, as mentioned in the above table, to your needs. - Click 'Send'.
- Check the response code and message.
Result example
{
"error-code":"200",
"error-code-label":"success"
}
Send and receive SMS
Send an SMS. If you are using a test application then VirtualNumber will be your own number that you registered with your webhook. When you reply to the number then you will see the response in your webhook.
SwaggerHub:
- Select
POST /send. - Click 'Try it out'.
- Edit the parameters by filling out
from(use your own number or theVirtualNumber),to,textand other fields at will. - Click 'Execute'.
- Check the response code and message.
Postman:
- Select
(POST) Send SMS. - Click the
Bodysection of the request and provide values for the following keys:from(use your own number or theVirtualNumber),toandtext. Other advanced keys can be filled at will. - Click 'Send'.
- Check the response code and message.
Result example
{
"message-count": "1",
"messages": [
{
"to": "316*****",
"message-id": "13000000*****",
"status": "0",
"remaining-balance": "*****",
"message-price": "*****",
"network": "20408"
}
]
}