Verify Documentation
Introduction
Nexmo is now called Vonage, but there are still references to Nexmo in our URLs, code snippets and message templates.
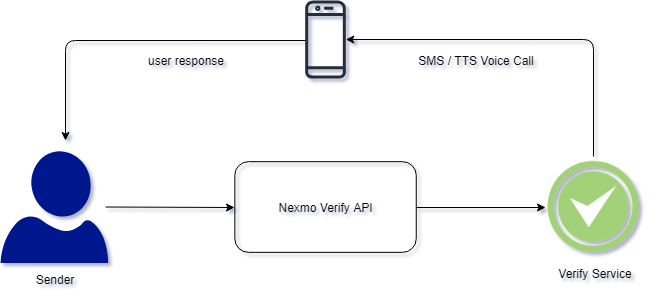
Vonage's (formerly called Nexmo) Verify API can be used for two-factor authentication, spam protection, hack protection and reaching users.
It sends a PIN via SMS text message and by telephone to verify user identity by proving that a user can be contacted at a specific telephone number. By default, the PIN is first sent via SMS. If there is no reply Vonage's Verify API will then try a voice call using text-to-speech (TTS).
API specification
Base URL
https://api-prd.kpn.com/communication/nexmo/verify
Conceptual model
Definitions
PIN
A secret code that is only known by the issuer and yourself. The issuer uses and validates the PIN to verify if it's actually you they are communicating with.
SMS
SMS stands for Short Message Service and is the most widely used type of text messaging. With an SMS, you can send a message of up to 160 characters to another device.
TTS
Abbreviation for Text-To-Speech. Written text is spoken by a computer-generated synthesized voice.
E.164
E.164 defines a general format for international telephone numbers. Plan-conforming numbers are limited to a maximum of 15 digits, excluding the international call prefix.
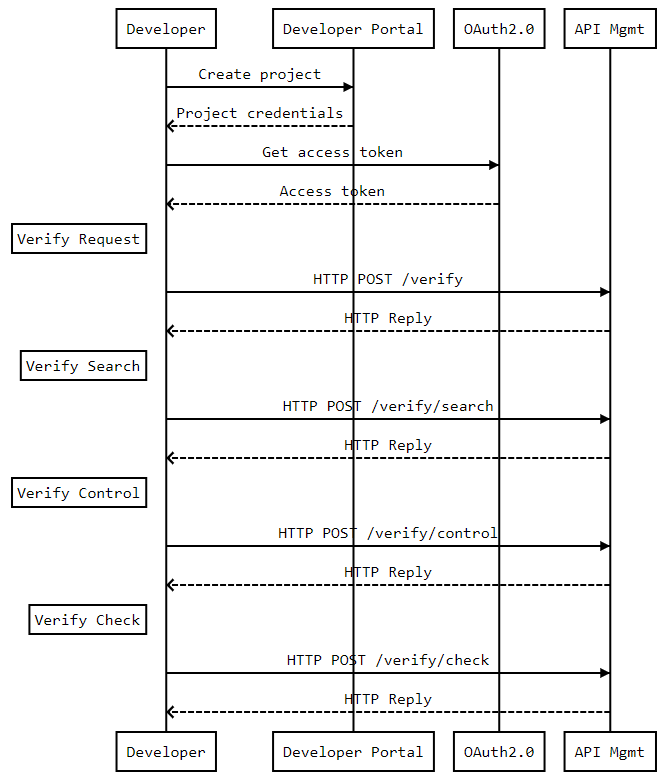
API workflow
Features and constraints
Features
- Authentication by mobile phone by SMS.
- Option to cancel the request.
- Check if the received user response is actually the same as the PIN sent by Vonage.
- If no response is send from the user, the system will call the user and tell the PIN.
Constraints
- After a verify request is sent, your application has to retrieve the PIN from the user and check it by means of an additional API call.
Getting started
Make sure you've read What's in it for you for more info on how to register and start testing APIs.
Authentication
The API follows the KPN Store API Authentication Standard to secure the API. It includes the use of OAuth 2.0 client_id and client_secret to receive an access token.
Go to the Authentication tab on top of this page to find out how to:
- Authenticate to an API using cURL.
- Authenticate to an API on Swaggerhub.
- Import Open API Specifications (OAS), also called Swagger files into Postman.
How to...
Send a verification request
Send a verification code to a user phone to start a one-time password, two-factor authentication or phone verification process.
SwaggerHub:
- Select
POST /. - Click 'Try it out'.
- Fill out the parameters
numberandbrandwith the telephone number (in E.164 format) and your brand message before the PIN. - Click 'Execute'.
- Check the response code and message.
Postman:
- Select
(POST) Verify Request. - Select the
Verify-Nexmoenvironment from the environment selector. - Open the environment and edit variables
numberandbrandwith the telephone number (in E.164 format) and your brand message before the PIN. - Click 'Send'.
- Check the response code and message.
Response example
{
"request_id":"1267899",
"status":"status",
"error_text":"error"
}
Check a verification
Check a verification code that a user has provided. Use the request_id from the response message that was received when the verification code was sent with the check.
SwaggerHub:
- Select
POST /check. - Click 'Try it out'.
- Fill out the parameters
request_idandcodewith request_id as returned from the previous request and the PIN that the user of the mobile phone provided you. - Click 'Execute'.
- Check the response code and message.
Postman:
- Select
(POST) Verify Check. - Select the
Verify-Nexmoenvironment from the environment selector. - Open the environment and edit variables
request_idandcodewith the request_id as returned from the previous request and the PIN that the user of the mobile phone provided you. - Click 'Send'.
- Check the response code and message.
Response example
{
"request_id":"1267899",
"status":"status",
"error_text":"error"
}
Search verification requests
Send a Verify Search request containing the request_id's of the Verify requests to search for. Check the status response parameter in the search response to see if the request was successfully completed.
SwaggerHub:
- Select
POST /search. - Click 'Try it out'.
- Fill out the parameters
request_idwith the request_id as returned from the initial request. - Click 'Execute'.
- Check the response code and message.
Postman:
- Select
(POST) Verify Search. - Select the
Verify-Nexmoenvironment from the environment selector. - Open the environment edit variables
request_idwith the request_id as returned from the initial request. - Click 'Send'.
- Check the response code and message.
Response example
{
"request_id":"1267899",
"status":"status",
"error_text":"error"
}
Control verification requests
You can control the progress of your Verify Requests by filling in the appropriate values. Supported values are:
Cancel: Stop the request.Trigger_next_event: Advance the request to the next part of the process.
Verification requests can't be canceled within the first 30 seconds. You must wait at least 30 seconds after sending a Verify Request before canceling.
SwaggerHub:
- Select
POST /control. - Click 'Try it out'.
- Fill out the parameters
request_idandcmdwith the request_id as returned from the initial request and one of the command options as described above. - Click 'Execute'.
- Check the response code and message.
Postman:
- Select
(POST) Verify Control. - Select the
Verify-Nexmoenvironment from the environment selector. - Open the environment edit variables
request_idandcmdwith the request_id as returned from the initial request and one of the command option as describe above. - Click 'Send'.
- Check the response code and message.
Response example
{
"request_id":"1267899",
"status":"status",
"error_text":"error"
}