Use WeSeeDo Direct v1 API with Node-RED
Happy with this tutorial and want to test the WeSeeDo Direct API more? Head over to the documentation and the API reference for all the information you need to use the API.
Go to WeSeeDo Direct documentation
Introduction
The WeSeeDo Direct API v1 allows you to create video meetings and share the meeting details with recipients. In this tutorial, we'll show you how to use the WeSeeDo Direct API in an easy way. We will have you embed the API functionality in Node-RED flows, which you can for example use to easily create new users and invite participants to WeSeeDo meetings.
What is Node-RED
Node-RED is a browser-based programming tool for wiring together hardware devices, APIs and online services in new and interesting ways. It is based on Node.js. It provides an editor with which you can wire together flows using the wide range of nodes in the palette that can be deployed to its runtime in a single click. Flows are individual programs. They consist of several nodes that perform a single task on a message object, which is passed down the flow. Flows are easy to create and there are a lot of free nodes and flows available. Find out more about Node-RED.
What you’ll learn
- How to create a new user with the WeSeeDo Direct API.
- How to retrieve an individual user with the WeSeeDo Direct API.
- How to install Node-RED locally or use it via the cloud.
- How to configure and connect Node-RED flows.
- How to obtain an access token (bearer token) from the KPN Developer Portal.
- How to send WeSeeDo Direct requests by triggering a Node-RED flow.
- How to debug flows to catch errors or success messages.
What you’ll need
-
For running Node-RED locally, you'll need to:
You follow a slightly different route to get set up if you decide to use Node-RED via the cloud. Then step 1 and 2 are replaced by a single step in which you set up the Node-RED cloud solution. The rest of the steps are essentially the same, though the execution is slightly different. It will all become clear in the description of the tutorial steps below.
-
For running Node-RED in the cloud, you'll need to:
1. Getting set up
Running Node-RED locally
1. Install Node.js {#install-node-js}
If there is no version of Node.js already installed on your system, you need to install a version, preferably the latest.
- Go to Download Node.js to find the appropriate version for your system.
2. Install Node-RED {#install-node-red}
There are many options on how to install or run Node-RED.
- Go to Running Node-RED locally to pick your favorite and follow the steps.
3. Start the Node-RED editor {#start-editor}
After you have installed the necessary components, it is time to start the Node-RED editor:
- Open a terminal like GitBash, PowerShell, or the like.
- Type
node-redand pressEnter.
You should see an output similar to:
28 Aug 13:04:55 - [info]
Welcome to Node-RED
===================
28 Aug 13:04:56 - [info] Node-RED version: v1.1.1
28 Aug 13:04:56 - [info] Node.js version: v12.18.2
28 Aug 13:04:56 - [info] Windows_NT 10.0.18363 x64 LE
28 Aug 13:04:57 - [info] Loading palette nodes
28 Aug 13:05:01 - [info] Settings file : \Users\xxx\.node-red\settings.js
28 Aug 13:05:01 - [info] Context store : 'default' [module=memory]
28 Aug 13:05:01 - [info] User directory : \Users\xxx\.node-red
28 Aug 13:05:01 - [warn] Projects disabled : editorTheme.projects.enabled=false
28 Aug 13:05:01 - [info] Flows file : \Users\xxx\.node-red\flows_DESKTOP-NSQIT41.json
28 Aug 13:05:01 - [info] Server now running at http://127.0.0.1:1880/
28 Aug 13:05:01 - [warn]
28 Aug 13:05:01 - [info] Starting flows
28 Aug 13:05:01 - [info] Started flows
Now you can access the Node-RED editor at http://localhost:1880.
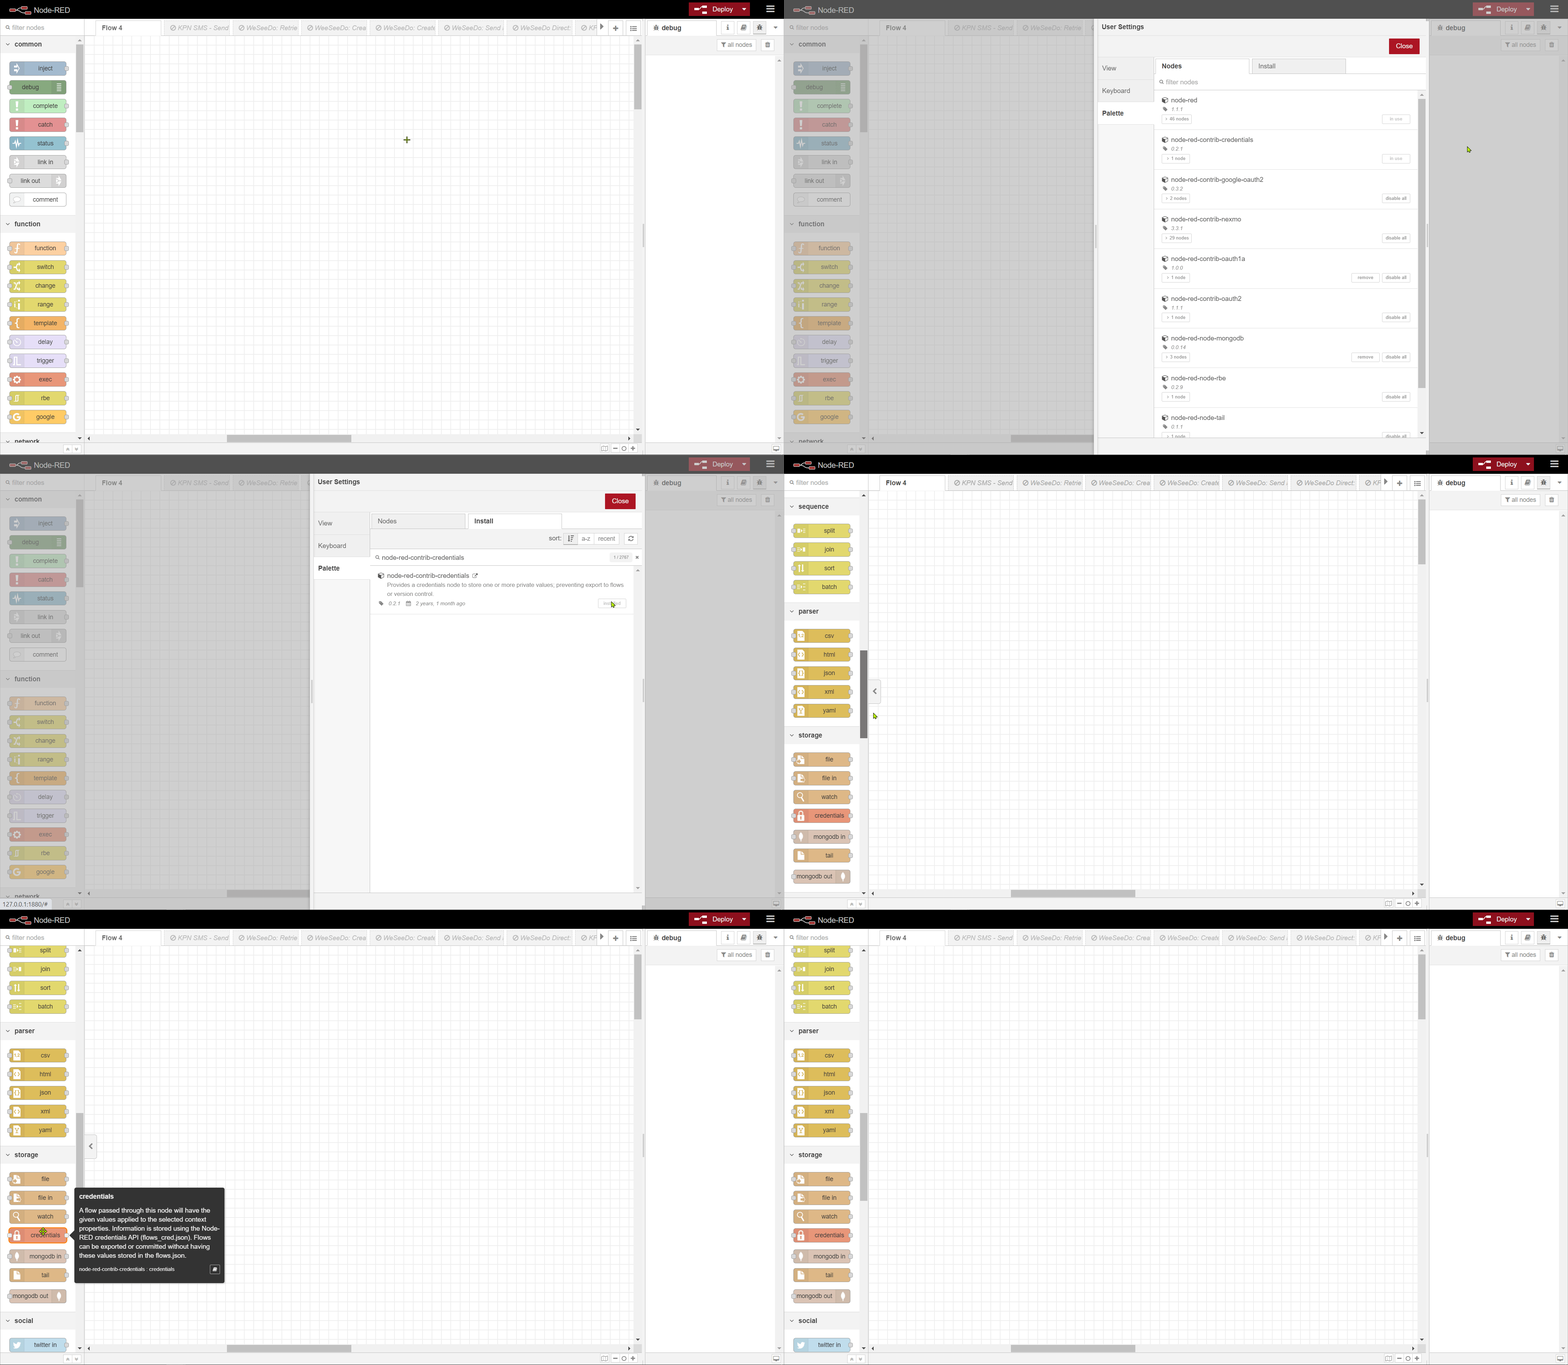
4. Install the credentials node {#install-cred-note-locally}
Install the node-red-contrib-credentials package to store your KPN Developer Portal credentials securely.
- Once you have your Node-RED editor open, go to the
Manage palettemenu. - Search for the
node-red-contrib-credentialspackage. - When you have found it, click
Install.
Example: Import credentials node - local
5. Import the tutorial flow {#import-flow-locally}
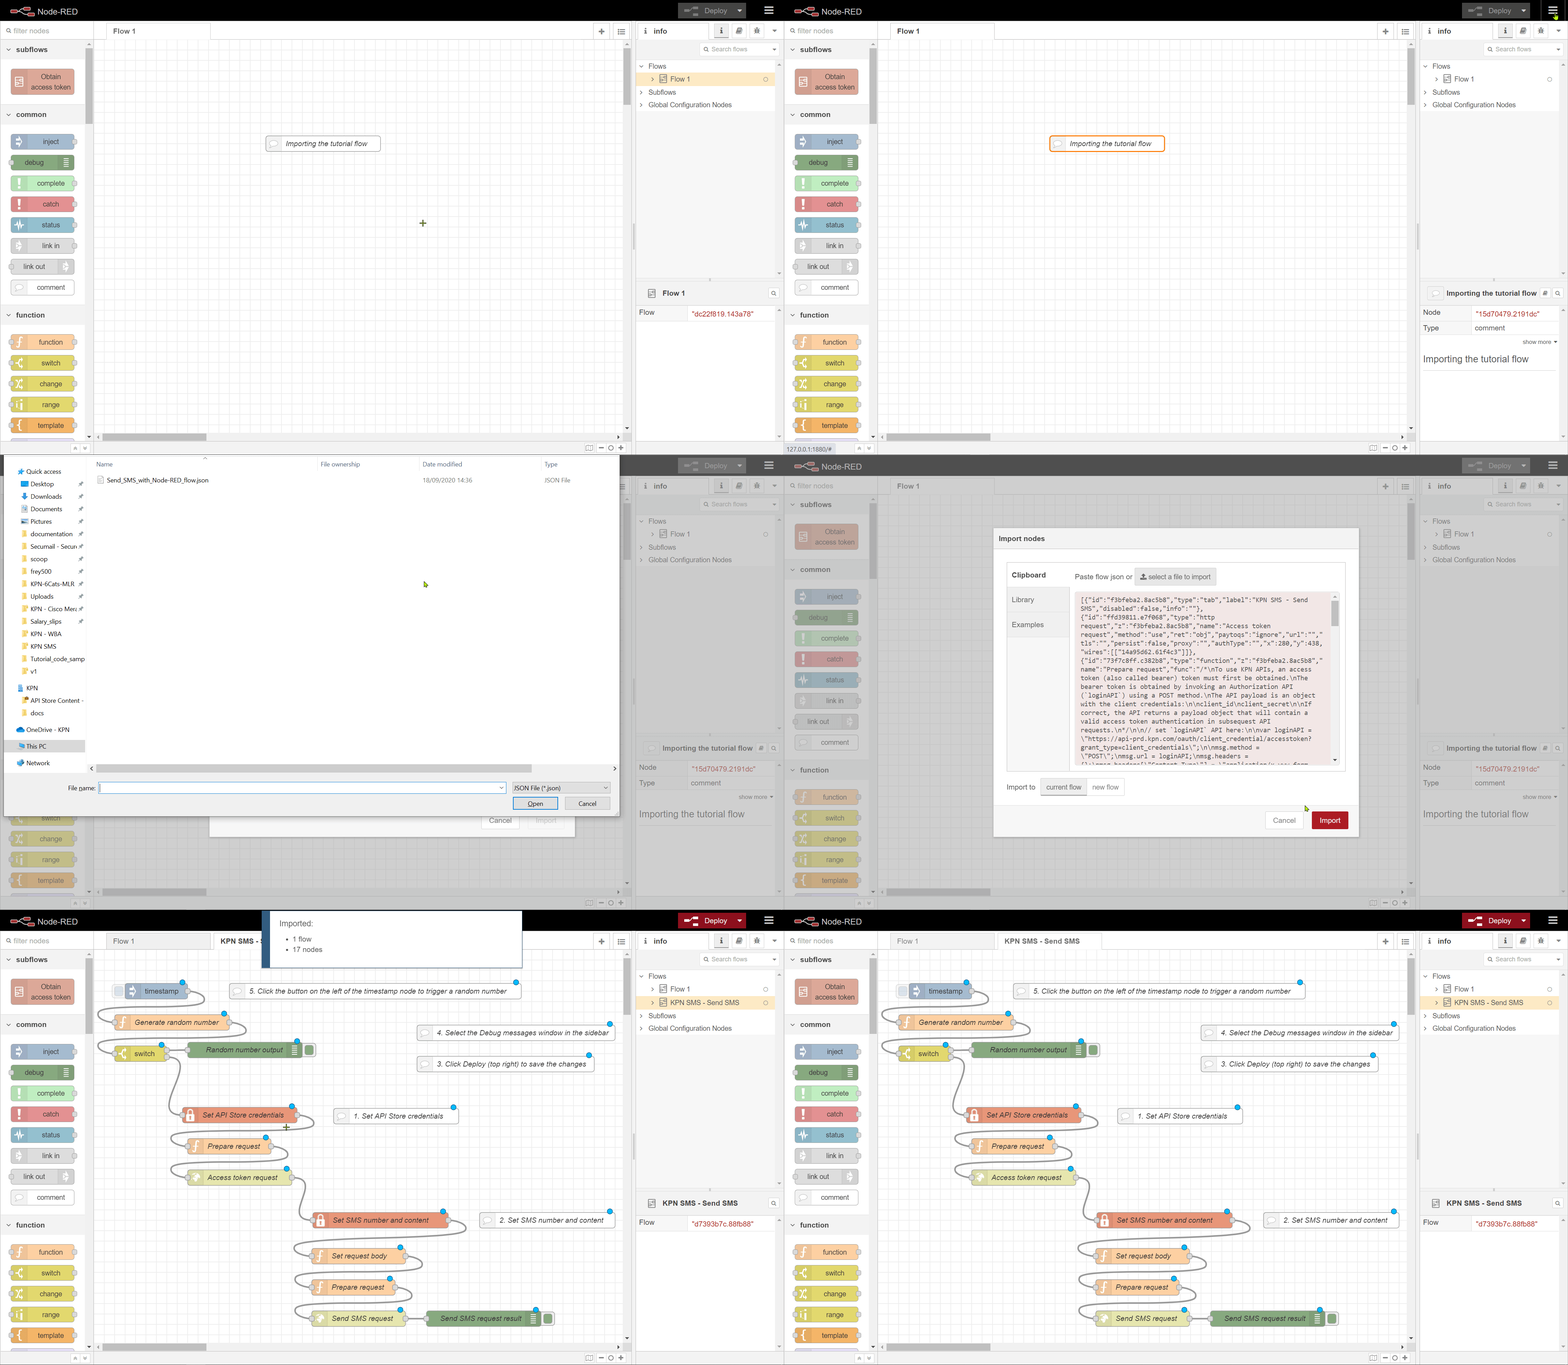
Node-RED makes it easy to save, share and move flows between computers using the export and import features. Import a flow by using the Import nodes dialog.
- Download the tutorial flow JSON code: Download from GitHub:
Tutorial_WeSeeDo-Direct_with_Node-RED_flows.json. - Right-click on the file and select
Save link as. - Save the file on your machine.
- In the Node-RED editor, click on the menu and select
Import. - Click
Select file to import. - Select the file you have downloaded from GitHub and click
Open. - Click
Import.
The imported flow is visible in a new tab called WeeSeeDo Direct v1. You can now go to the step 'Send API requests'.
Example: Import of a generic Node-RED flow - local
Running Node-RED in the cloud
The cloud solution allows you to run Node-RED without any installation. Just sign up to a free demo account.
This is an external solution and KPN Developer Portal is not responsible for its availability.
1. Set up the cloud solution {#login-cloud}
- Create an account on FRED: Front End For Node-RED.
- Select the free
FRED Short planand sign up. - Log in to the account. The Node-RED online editor will start up and display example flows on the tab
Sheet1. You can ignore that.
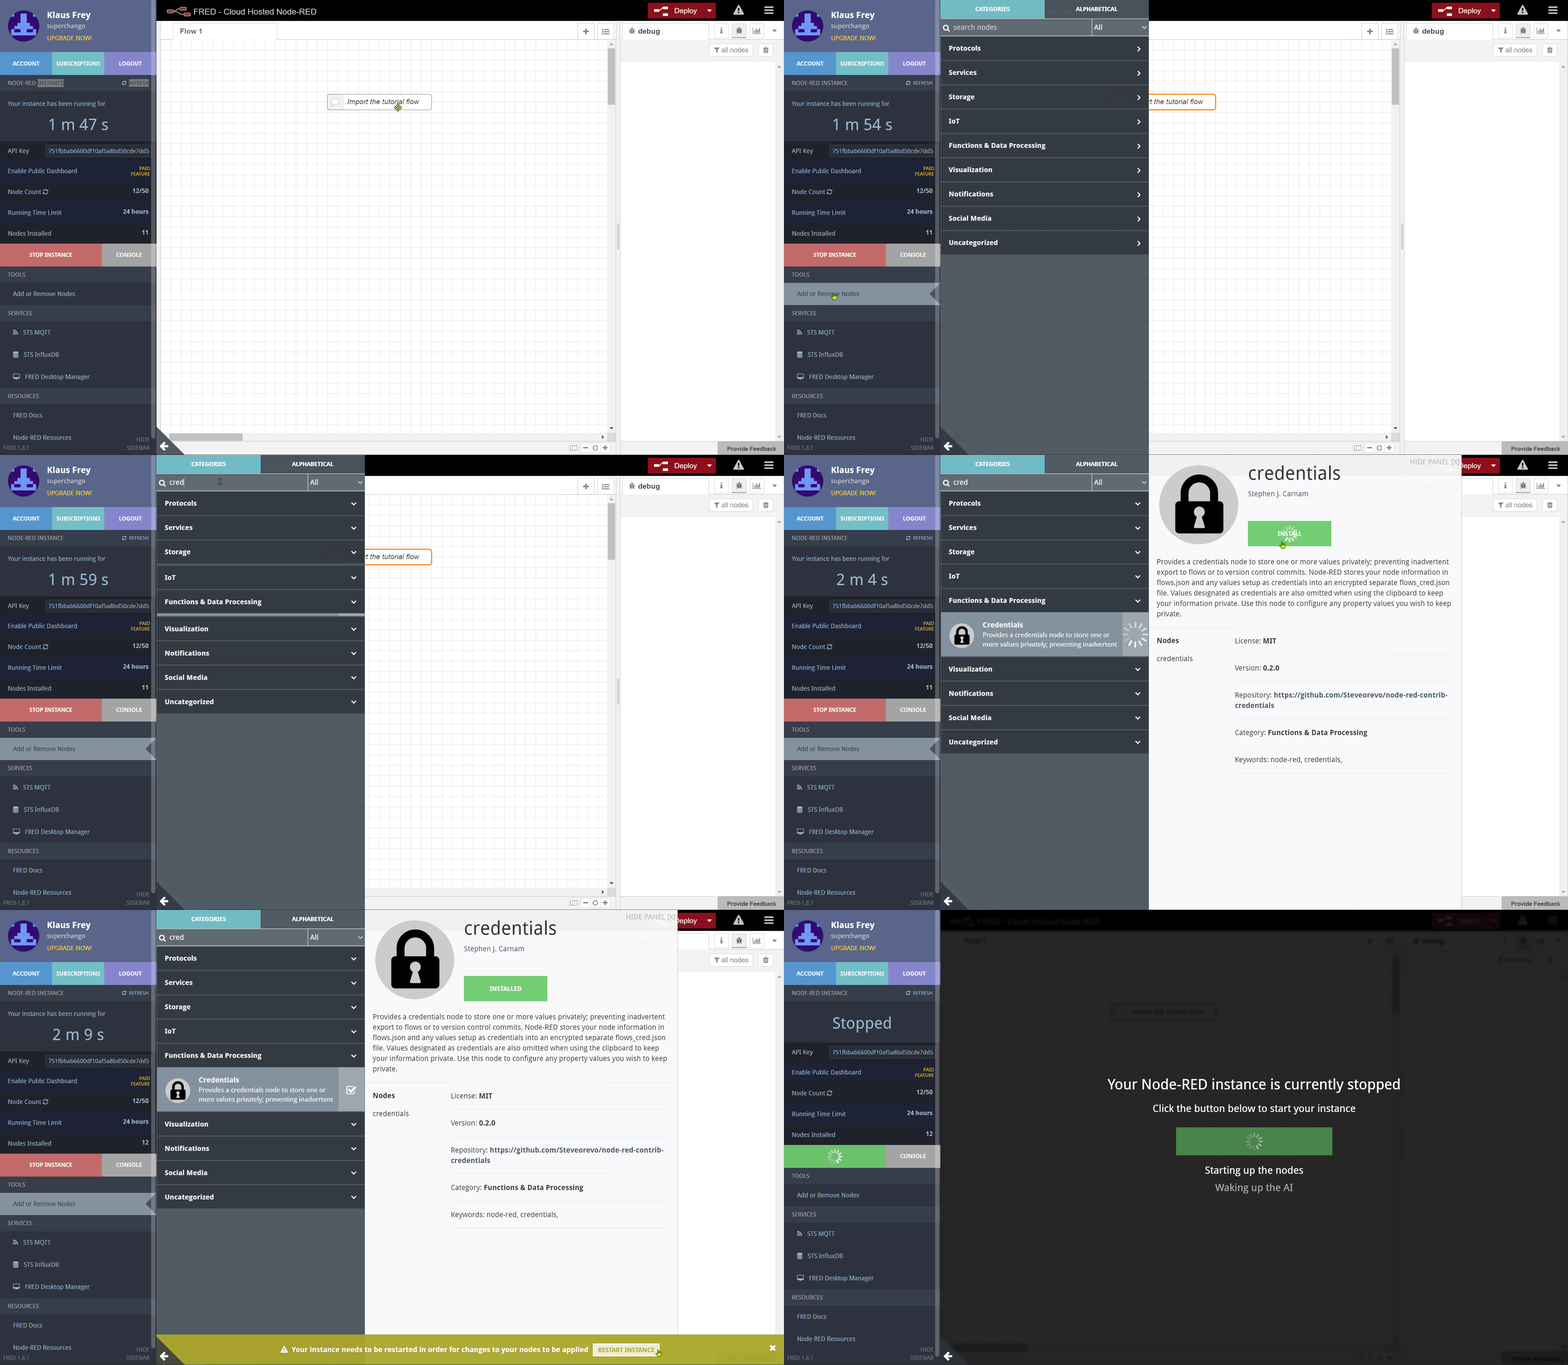
2. Install the credentials node {#import-cred-cloud}
- Once you have your cloud Node-RED editor open, go to the
Toolsmenu on the left. - Select
Add or Remove Nodes. - In the field
Search nodessearch forCredentials. - When you have found it, click
Install. - After the node has been installed, click
Restart Instance.
Now you can import the tutorial flow (see the next step below).
Example: Import credentials node - cloud
3. Import the tutorial flow {#import-flow-cloud}
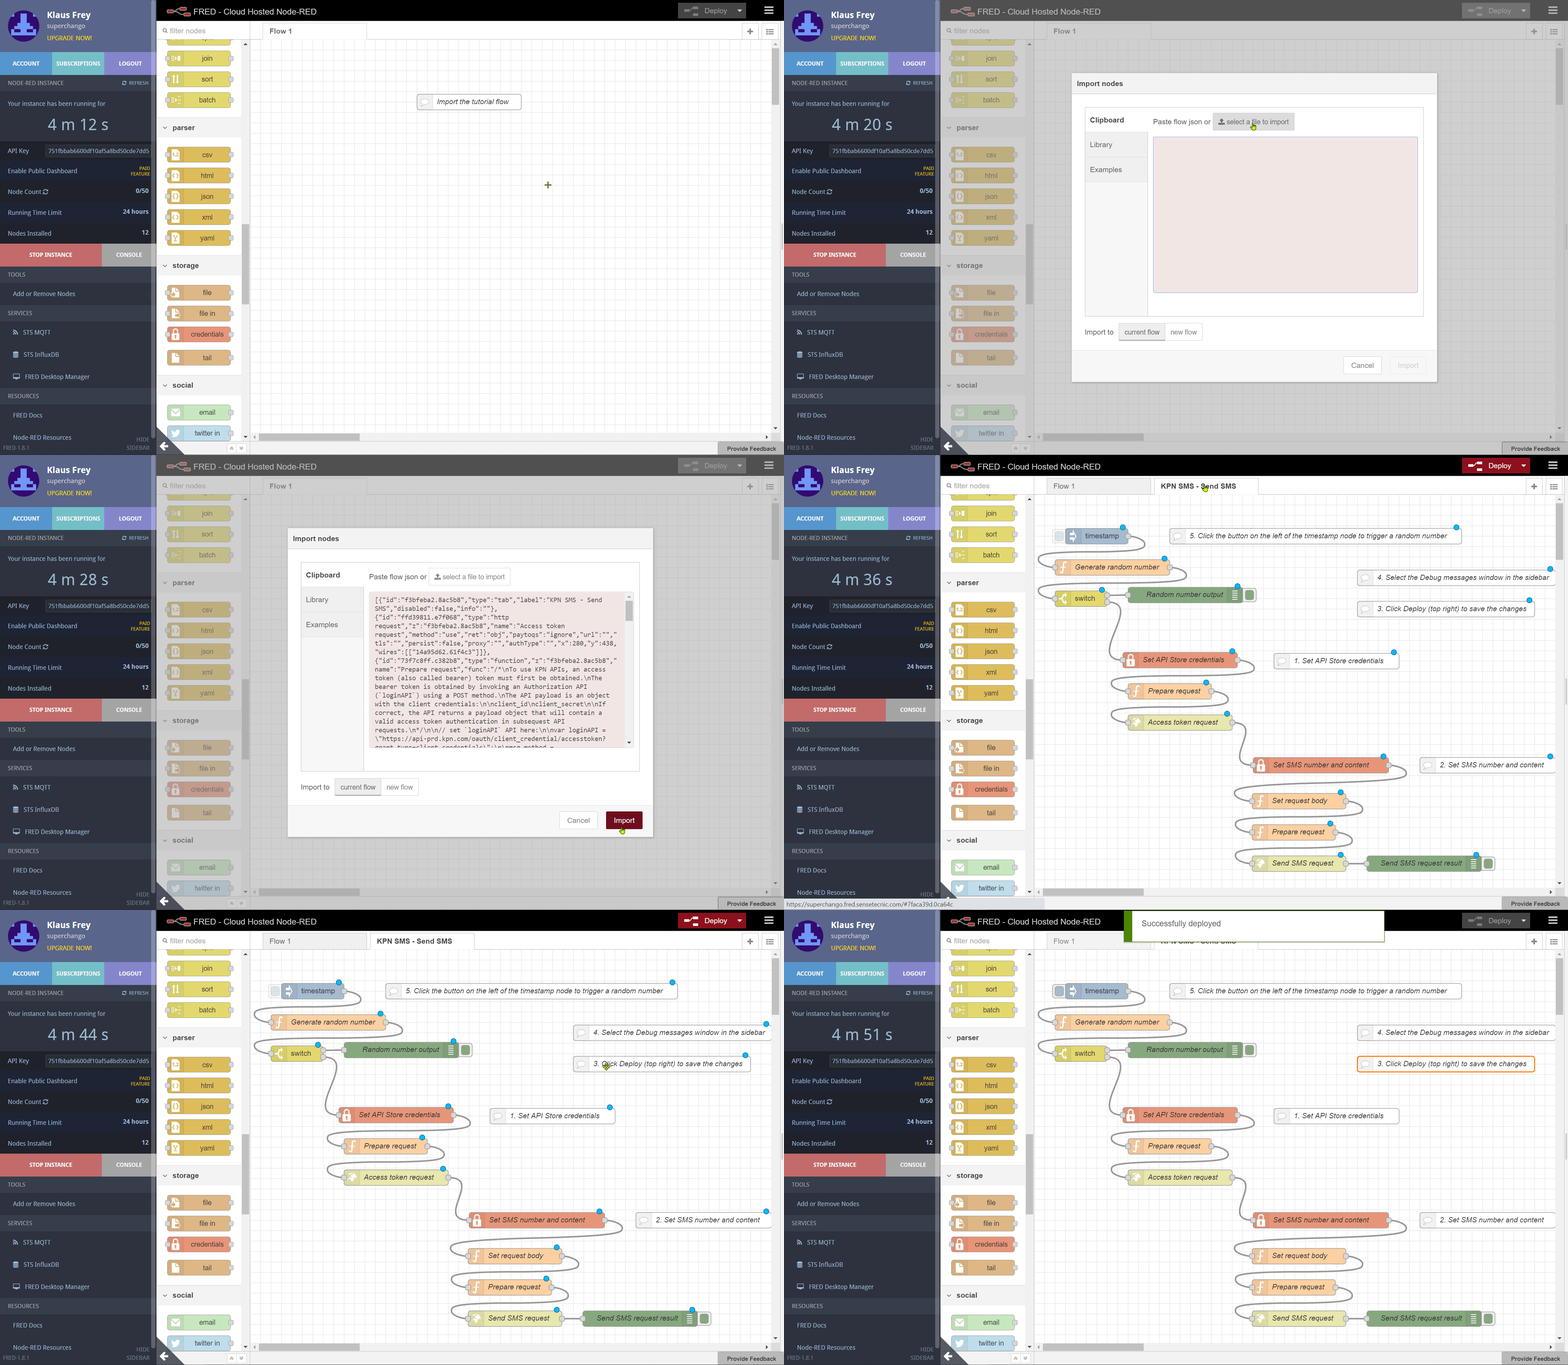
Node-RED makes it easy to save, share and move flows between computers using the export and import feature. You can import a flow by using the Import nodes dialog.
- Download the tutorial flow JSON code: Download from GitHub:
Tutorial_WeSeeDo-Direct_with_Node-RED_flows.json. - Right-click on the file and select
Save link as. - Save the file on your machine.
- In the Node-RED editor, click on the menu on the right and select
Import. - Click
Select file to import. - Select the file you have downloaded from GitHub and click
Open. - Click
Import.
The imported flow is visible in a new tab called WeeSeeDo Direct v1. You can now go to the step 'send API requests'.
Example: Import of a generic Node-RED flow - cloud
The tutorial flow appears in a new tab. As you can see, the flow is divided into sections:
- The first flow on the left obtains the access token from the KPN Developer Portal by invoking an Authorization API using a
POSTmethod. - The other flows on the right are the actual WeSeeDo requests.
Tutorial flow with WeSeeDo endpoints
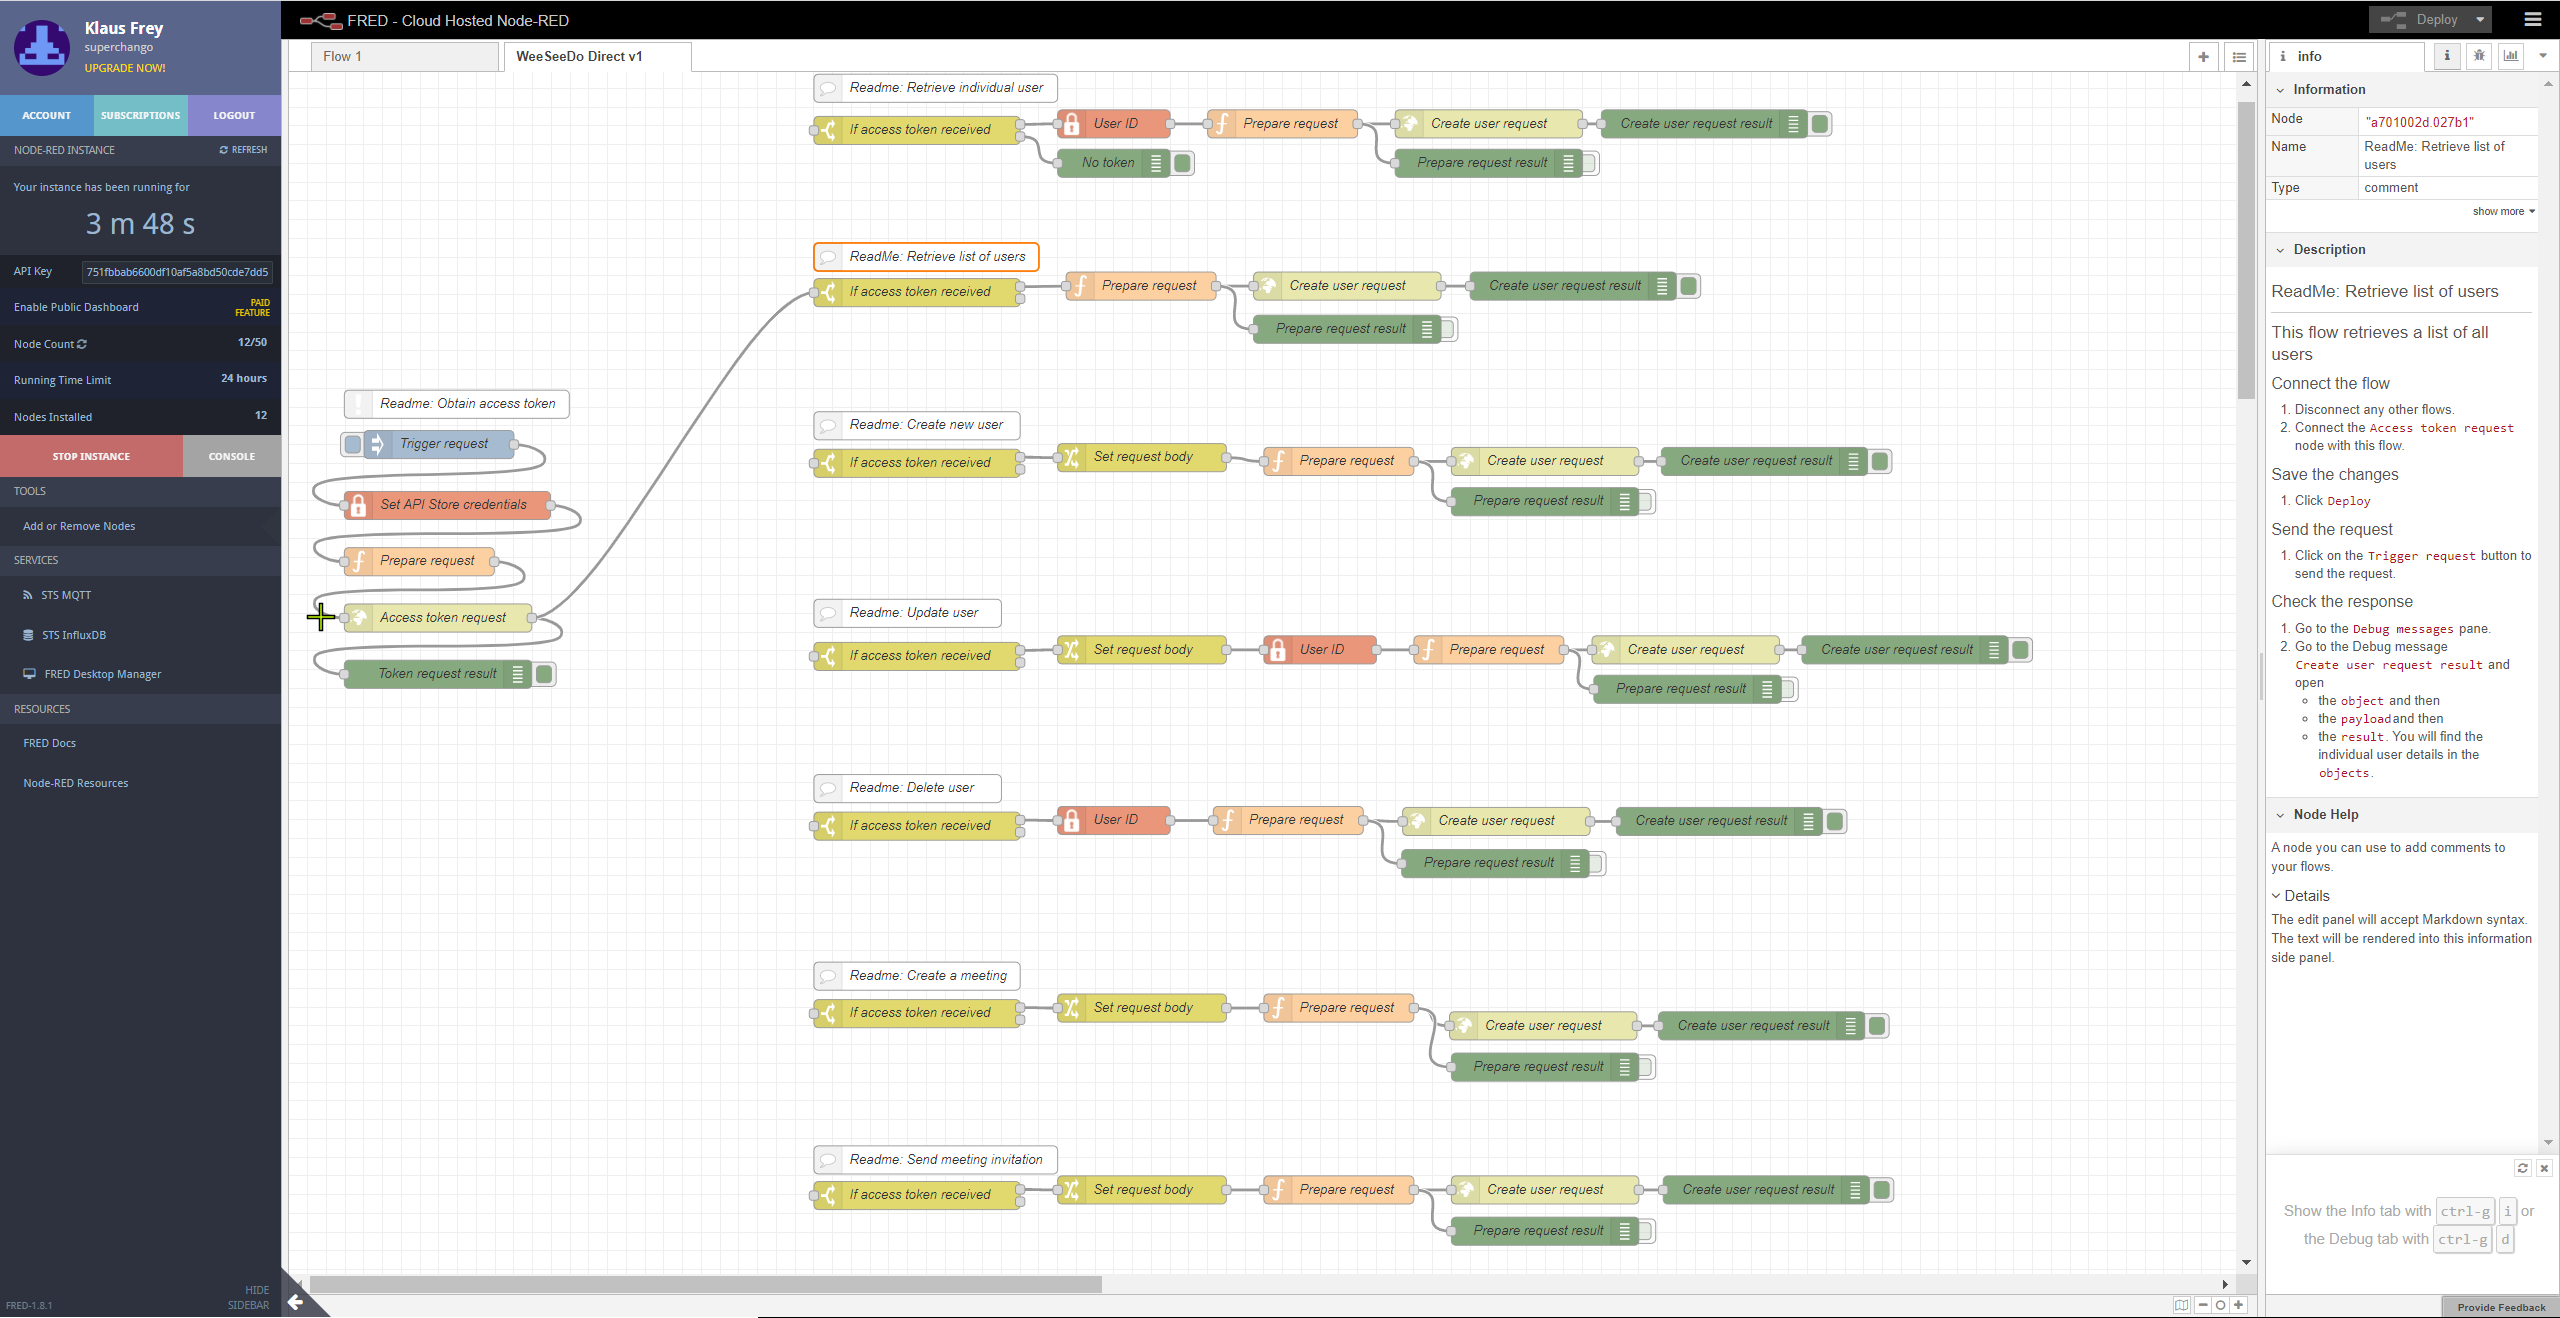
Have a look at the different nodes in the flow:
-
Input nodes are used to input data into a Node-RED application or flow. They have at least one output endpoint, which is shown in the small grey square on their right side. Input nodes allow you to connect data from other services, such as Twitter or temperature sensors, to manually input data into a flow using the blue
Trigger requestnode. -
Output nodes are used to send data outside of a Node-RED flow. They have a single input endpoint on their left side. Output nodes allow you to send data to other services such as Twitter, or to send data to the debug messages window in the sidebar. You can use green
debugnodes to display the success and error messages. Switch them off and on by clicking on the button on the right side. -
Processing nodes are used to process data. They have one input endpoint on their left side and one or more output endpoints on their right side. You can use them to do stuff, such as creating random numbers, and use the data to trigger a message and to write custom code as we do with the orange
functionnodes. -
Security nodes such as the red
credentialsnode are used to store sensitive data that is passed on in the API request, such as API keys, telephone numbers, user credentials, and so on. If you copy or export thecredentialsnode, the data stored in the node will not be copied or exported.
2. Send API requests {#send-api-requests}
Now that have added your credentials to the flow, you are ready to make a few API requests.
We will cover only a few API requests so you get a feeling how Node-RED works. You can see detailed instructions in the
Readme: xxxnodes next to the individual flows.
If you need more information about the API endpoints and request parameters please refer to the API reference on SwaggerHub.
1. Add your My Developer Portal credentials
In order to interact with the WeSeeDo Direct API, you’ll need to do a couple of things. Log into your My Developer Portal account, and go to the Sandbox to find your client ID and client secret. Copy them or make a note of them. Then add these credentials to the secure Set credentials node:
- Double-click on the
Set credentialsnode. - Copy and paste your client ID into the field on the right of
az, abovemsg.client_id. - Copy and paste your client secret into the field on the right of
az, abovemsg.client_secret. - Click
Done. - Click
Deployto save the changes to the flow.
Protect your My Developer Portal credentials like you protect your passwords.
2. Create new user
First, let's start with creating a new agent user. You need to send the company_email in the header and the new user details in the JSON template.
Make sure that the Debug messages window is visible in the sidebar, so you can see the success and error messages.
- Connect the
Access token requestnode with theIf access token receivednode of the flowCreate new user. - Double-click the node
Set request body. - Double-click the three dots to open the JSON template.
- Enter the user details of the new user. Leave
localeasnl. See the example below. - Click Done.
- Double-click the node
Prepare request. - Add the line
msg.headers["company_email"] = "your.name@email.com";Forcompany_emailuse the e-mail address that you used to get onboarded in the My Developer Portal. - Click Done.
- Now click Deploy to save the changes to the flow.
- Trigger the API request by clicking on the blue button on the
Trigger requestnode. - Check the response in the
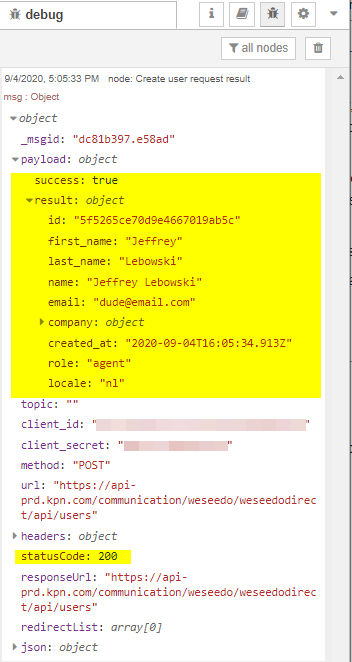
Debug messagespane.
JSON example
{
"first_name": "Jeffrey",
"last_name": "Lebowski",
"password": "bowling.1234",
"role": "CFO",
"email": "dude@email.com",
"locale": "nl",
"company": "Coen Bros Ltd"
}
Success message
3. Retrieve individual user
Now we can retrieve the user we have just created.
Make sure that the Debug messages window is visible in the sidebar, so you can see the success and error messages.
- Connect the
Obtain access tokenflow with the Retrieve individual user flow. - Double-click the node
User ID. - Enter the ID of the user you have just created into the field
azaboveuser_id. - Click Done.
- Now click Deploy to save the changes to the flow.
- Trigger the API request by clicking on the blue button on the
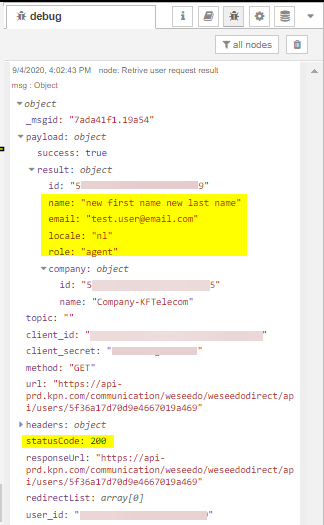
Trigger requestnode. - Check the response in the
Debug messagespane.
Congratulations
Congratulations, you have successfully created an agent user with the WeSeeDo Direct API and Node-RED.
You have learned how to import flows into Node-RED and how to add your credentials and the payload of the API call.
Get help
Don't hesitate to contact us if you have any questions about this tutorial.
What’s next?
Check out some of these tutorials: