Apidaze Voice Documentation
Introduction
With this API you can create or add voice features to your apps while still using your favorite programming language. No knowledge of complex telephone systems is required. You just need a web server and follow simple steps to make it work.
API specification
Base URL
https://api-prd.kpn.com/communication/apidaze/cpaas
Conceptual model
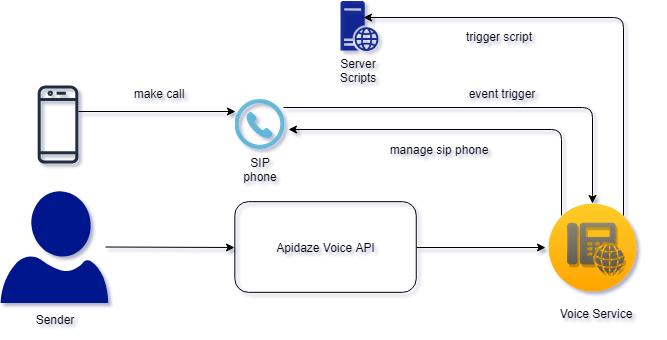
Definitions
Callback (WebHook)
A Callback or WebHook is a HTTP POST callback implemented by you, that can be called by another system when an event is triggered on that system to notify you. You will need to make the address of your webhook/callback known on the other system to make it work.
Virtual number
A virtual number is a telephone number without a directly associated telephone line. Usually these numbers are programmed to forward incoming calls to one of the pre-set telephone numbers, chosen by the client: fixed, mobile or VoIP.
SIP
The Session Initiation Protocol (SIP) is used for signaling and controlling multimedia communication sessions in applications of Internet telephony for voice and video calls, in private IP telephone systems, in instant messaging over Internet Protocol (IP) networks as well as mobile phone calling over LTE (VoLTE).
API workflow
Features and constraints
Features
- Event based system that will be triggered during the call flow.
- Use your own scripting to take action on events in the call flow.
- Support for sample playing in
.wavformat. - Text to speech support.
Constraints
- Works with a SIP account.
- For text to speech currently supported languages are: en-US, fr-FR, it-IT and es-ES.
Getting started
Make sure you've read What's in it for you for more info on how to register and start testing APIs.
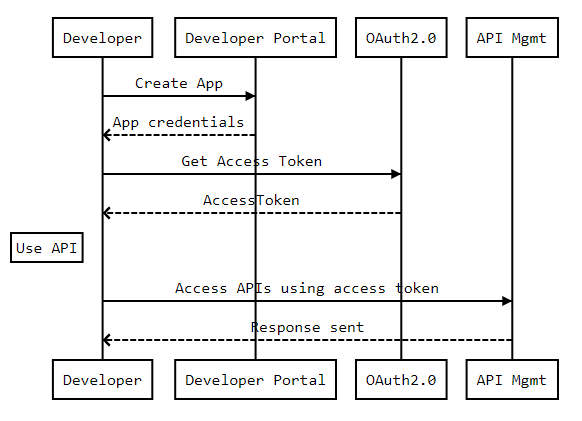
Authentication
The API follows the KPN Store API Authentication Standard to secure the API. It includes the use of OAuth 2.0 client_id and client_secret to receive an access token.
Go to the Authentication tab on top of this page to find out how to:
- Authenticate to an API using cURL.
- Authenticate to an API on Swaggerhub.
- Import Open API Specifications (OAS), also called Swagger files into Postman.
Setting up management APIs
You have an API for XML scripting and a VoIP SIP API. These REST management APIs expose actions that help your apps to interact with APIdaze’s Telco platform in multiple ways. Voice traffic never flows through these APIs.
XML scripting API
You can set the URL from where Apidaze fetches XML instructions to run on the Apidaze platform. You can write your various scripts there using the Script Reference and then test them.
VoIP SIP API
You can manage your phone numbers, connect directly with other SIP carriers (inbound and outbound), manage your SIP accounts, voicemail boxes and messages, and provision your hardphones.
To start you need to follow the below steps.
Set the URL for your External Script
Your ExternalScript is the core element of your application. It must be accessible by Apidaze at a public HTTP URL. Any PaaS (Platform as a Service) like Heroku can be used here, and you may of course use your own web infrastructure. You can set the URL of your ExternalScript using 'External Script Create' resource of XML Scripting API.
Set up your code
You can set up your code using the below sources:
Script Reference: the XML instructions set to handle your calls
API Reference: the REST based management APIs
Set up your SIP account
Create your SIP account using 'SIP Account Create' resource of VoIP SIP API.
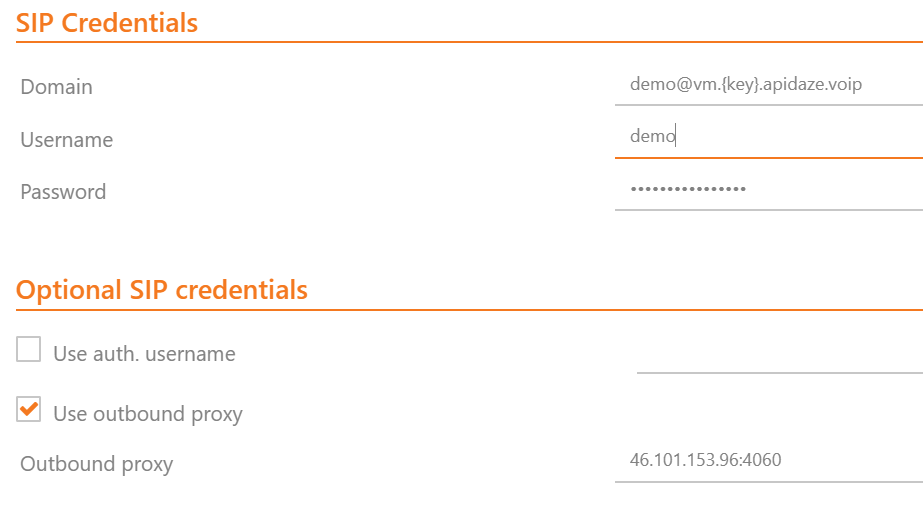
Set up your SIP client
In order to setup your SIP client your need fetch below details using REST APIs. We will use Zoiper as an example SIP Client.
a) Domain/Host: You can get this info using 'SIP Account Status' resource of VoIP SIP API. Ask our support for the key.
b) Username: You can get this info using 'SIP Account List' resource of VoIP SIP API.
c) Password: You can get this info using 'SIP Account List' resource of VoIP SIP API.
d) 'Optional SIP credentials' > 'Use outbound proxy' should be filled with 46.101.153.96:4060. This is a fixed value and you cannot configure it.
e) Account Name: You will see this in your app once your registration is successful.
Your configuration should look like this:
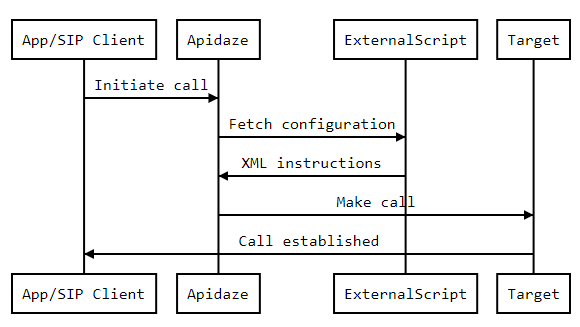
High level picture:
How to...
Manage VOIP SIP API requests
List SIP accounts
Get a list of SIP accounts currently set up.
SwaggerHub:
- Select
GET /sipaccounts. - Click
Try it out. - Click
Execute. - Check the response code and message.
Postman:
- Select
(GET) SIP Account List. - Click
Send. - Check the response code and message.
Response example
[
{
"id": "string",
"name": "string",
"sip": {
"username": "string",
"password": "string"
},
"callerid": {
"internal_name": "string",
"internal_number": "string",
"external_name": "string",
"external_number": "string"
},
"voicemail": {
"mwi_account": "string"
},
"created_at": "string",
"updated_at": "string"
}
]
Create a new SIP account
SwaggerHub:
- Select
POST /sipaccounts. - Click
Try it out. - Edit the parameters by filling out
usernamewhich will be the username to identify this SIP account. Other optional values areinternal_caller_id_number,external_caller_id_number,nameandmwi_account. - Click
Execute. - Check the response code and message.
Postman:
- Select
(POST) SIP Account Create. - Click on the
Bodysection and enter a value for theusernamevariable, which will be the username to identify this SIP account. Other optional values areinternal_caller_id_number,external_caller_id_number,nameandmwi_account. - Click
Send. - Check the response code and message.
Get a specific SIP account
Get the detail of a specific SIP account determined by its ID.
SwaggerHub:
- Select
GET /sipaccounts/{id}. - Click
Try it out. - Edit the parameters by filling out
idwhich will be the id to identify this SIP account. - Click
Execute. - Check the response code and message.
Postman:
- Select
(GET) SIP Account Read. - Provide the id of the account to read in the parameter
idof the URL. - Click
Send. - Check the response code and message.
Update a SIP account
Update the values of a single SIP account determined by its ID.
SwaggerHub:
- Select
PUT /sipaccounts/{id}. - Click
Try it out. - Edit the parameters by filling out
idwhich will be the id to identify this SIP account. Other optional values areinternal_caller_id_number,external_caller_id_number,nameandmwi_account. - Click
Execute. - Check the response code and message.
Postman:
- Select
(PUT) SIP Account Update. - Click on the
Bodysection and enter a value for theidvariable, which will be the id to identify this SIP account. Other optional values areinternal_caller_id_number,external_caller_id_number,nameandmwi_account. - Click
Send. - Check the response code and message.
Delete a SIP account
Deletes a single SIP account determined by its ID.
SwaggerHub:
- Select
DELETE /sipaccounts/{id}. - Click
Try it out. - Edit the parameters by filling out
idwhich will be the id to identify this SIP account. - Click
Execute. - Check the response code and message.
Postman:
- Select
(DEL) SIP Account Delete. - Provide the id of the account to read in the parameter
idof the URL. - Click
Send. - Check the response code and message.
Get the status a SIP account
Gets the status of a single SIP account determined by its ID.
SwaggerHub:
- Select
GET /sipaccounts/{id}/status. - Click
Try it out. - Edit the parameters by filling out
idwhich will be the id to identify this SIP account. - Click
Execute. - Check the response code and message.
Postman:
- Select
(GET) SIP Account Status. - Provide the id of the account to read in the parameter
idof the URL. - Click
Send. - Check the response code and message.
Manage XML scripting API requests
Get a list of external scripts as currently set up.
SwaggerHub:
- Select
GET /externalscripts. - Click
Try it out. - Click
Execute. - Check the response code and message.
Postman:
- Select
(GET) External Script List. - Click
Send. - Check the response code and message.
Response example
[
{
"id": "string",
"name": "string",
"url": "string",
"created_at": "string",
"updated_at": "string"
}
]
Create new external script
SwaggerHub:
- Select
POST /externalscripts. - Click
Try it out. - Edit the parameters by filling out
urlwhich points to the URL where your script is hosted. Other optional values arename. - Click
Execute. - Check the response code and message.
Postman:
- Select
(POST) External Script Create. - Click on the
Bodysection and enter a value for theurlvariable, which points to the URL where your script is hosted. Other optional values arename. - Click
Send. - Check the response code and message.
Get a specific external script
Get the detail of a specific external script determined by its ID.
SwaggerHub:
- Select
GET /externalscripts/{id}. - Click
Try it out. - Edit the parameters by filling out
idwhich will be the id to identify this external script. - Click
Execute. - Check the response code and message.
Postman:
- Select
(GET) External Script Read. - Provide the id of the external script to read in the parameter
idof the URL. - Click
Send. - Check the response code and message.
Update an external script
Update the values of a single external script determined by its ID.
SwaggerHub:
- Select
PUT /externalscripts/{id}. - Click
Try it out. - Edit the parameters by filling out
idwhich will be the id to identify this external script andurl, which points to the URL where your script is hosted. Other optional values arename. - Click
Execute. - Check the response code and message.
Postman:
- Select
(PUT) External Script Update. - Click on the
Bodysection and enter a value for theidvariable, which will be the id to identify this external script, as well asurl, which points to the URL where your script is hosted. Other optional values arename. - Click
Send. - Check the response code and message.
Delete an external script
Deletes a single external script determined by its ID.
SwaggerHub:
- Select
DELETE /externalscripts/{id}. - Click
Try it out. - Edit the parameters by filling out
idwhich will be the id to identify this external script. - Click
Execute. - Check the response code and message.
Postman:
- Select
(DEL) External Script Delete. - Provide the
idwhich will be the id to identify this external script. - Click
Send. - Check the response code and message.
Test an external script
Trigger a single external script determined by its ID.
SwaggerHub:
- Select
GET externalscripts/test. - Click
Try it out. - Edit the parameters by filling out
url, which points to the URL where your script is hosted. - Click
Execute. - Check the response code and message.
Postman:
- Select
(GET) External Script Test. - Provide the
idwhich will be the id to identify this external script. - Click
Send. - Check the response code and message.