Voice Documentation
Introduction
Nexmo is now called Vonage, but there are still references to Nexmo in our URLs, code snippets and message templates.
Vonage's Voice API allows you to create and manage high-quality voice operation applications on the cloud, such as IVR, WebRTC and PSTN calling. Voice is a HTTP-based RESTful API. It is accessed over HTTPS combined with OAuth2.0 for extra security. Request and response bodies follow the JSON format to make the exchange of information fast, easy and reliable.
API specification
Base URL
https://api-prd.kpn.com/communication/nexmo
Conceptual model

Definitions
Conversation, leg, conference
Communication can be 1-to-1 or 1-to-n from or to the Vonage platform. While 1-to-1 calls are known as a leg, 1-to-n calls are known as a conversation. Each call connected to a conversation is its own leg.
NCCO
A Nexmo Call Control Object (NCCO) is a JSON array that you use to control the flow of a Voice API call. For your NCCO to execute correctly, the JSON objects must be valid.
The Call event model is asynchronous. A static or dynamically created NCCO script provides the business logic for your Call. When a Call is placed to your number, Vonage (formerly Nexmo) makes a synchronous request to the webhook endpoint you set as the answer_url for your number and retrieves the NCCO object that controls the Call.
Extended information regarding NCCOs can be found in our NCCO reference page.
Webhook
Method to augment or alter the behavior of your application via user-defined HTTP callbacks. In your case webhook defines the behavior of your application.
DTMF
Dual Tone Multi Frequency (DTMF), is a form of signaling used by phone systems to transmit the digits 0-9 and the * and # characters.
Text to speech
Vonage uses text to speech engines to allow you to play machine generated speech in your calls. This feature can be added via NCCOs with the use of talk action or by making a put request on an in-progress call. There are 23 languages available with different styles and genders.
Recording
Vonage's Voice API offers the ability to record call audio in several ways:
- Record a call between two people in a passive 'monitor' manner.
- Record audio from a single caller when they are prompted. For example, in a voicemail system.
- Enable recording for a named conversation (using the conference action explained in the NCCO reference).
SIP Trunk
To use Session Initiation Protocol (SIP), see the SIP documentation page.
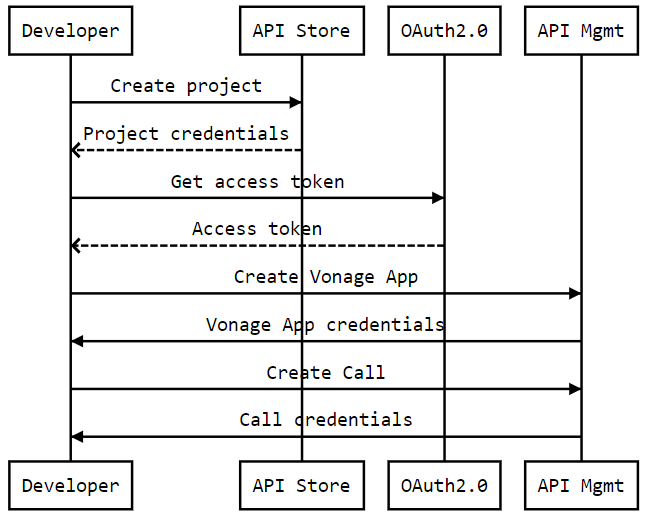
API workflow
Features
- Scales with existing web solutions.
- Easy to configure.
- Records and stores any call.
- Conference calls.
- Text to speech messages in 23 languages.
Getting started
Make sure you've read What's in it for you for more info on how to register and start testing APIs.
Authentication
The API follows the KPN Store API Authentication Standard to secure the API. It includes the use of OAuth 2.0 client_id and client_secret to receive an access token.
Go to the Authentication tab on top of this page to find out how to:
- Authenticate to an API using cURL.
- Authenticate to an API on Swaggerhub.
- Import Open API Specifications (OAS), also called Swagger files into Postman.
How to...
The API is divided into 2 groups of resources:
- Application: Vonage App Management resource. Allows CRUD on applications.
- Voice: Voice call management resource. Allows CRUD on the call.
Create the Vonage Application
Remember the application UUID, because it will be needed to make calls.
SwaggerHub:
- Select
POST /applications. - Click 'Try out'.
- Edit the request body by filling the name and
answer_url. - Click 'Execute'.
- Check the response code and message.
Postman:
- Click on
(POST) Create new application resource. - Fill the
nameandanswer_url. - Click 'Send'.
- Check the response code and message.
Create a call
SwaggerHub:
- Select
POST /voice/calls. - Click 'Try out'.
- Update the
ApplicationIdheader with your application identifier. - Edit the request body by filling
to,fromandanswer_urlfields. - Click 'Execute'.
- Check the response code and message.
Postman:
- Click on
(POST) Create an outbound call. - Update the
Headers section by filling theApplicationId` field. 3.. Update the body fields. - Click 'Send'.
- Check the response code and message.